Compare and Merge Polyspace Platform Projects and Configurations Before Submission to Source Control
You can submit Polyspace Platform projects (.psprjx files), workspaces (.pswks files), external configurations (.pscfg files) and external tests (.pstestd files) to source control just like any other code. Before submission to source control (check-in), you might want to do the following:
Compare (diff) project, workspace, or configuration files: See differences between your project or configuration and the latest stable version of the project or configuration in the repository.
Merge project, workspace, or configuration files: Merge your project or configuration with the last checked-in version in the repository and resolve conflicts that occur during the merge. For instance, if several users check out a project or configuration at the same time and make changes, depending on the order of check-in, some of those changes might conflict with each other.
You can compare and merge Polyspace® Platform project files (.psprjx files), workspace files (.pswks files), and external configuration files (.pscfg files) just like other text files. However, Polyspace provides a diff/merge tool that allows you to view the projects or external configurations in a tree structure, see the differences, and resolve the conflicts more easily. This example shows how to use the diff/merge tool to compare Polyspace Platform projects. A similar workflow applies to external configurations.
Example Files
The example projects in this section are based on the source code and test cases created in the Generate Additional C/C++ Tests for Missing Code Coverage example.
Compare Projects
Suppose that you want to see the difference between two projects:
baseProject.psprjx– Base version of the project in the repository.myProject.psprjx– Your version of the project. This is the version where you made some changes after checking out the base version from the repository. For instance, suppose that you made the following changes:You added two new test cases.
You changed a test input in an existing test.
The two projects opened in the Polyspace Platform user interface might look like the following:
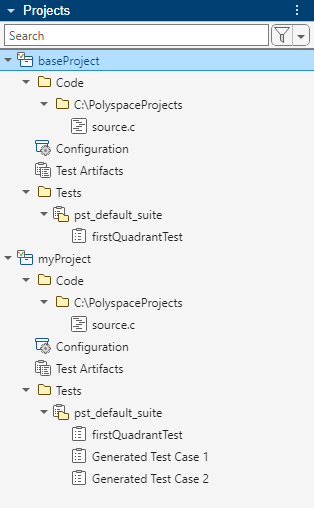
myProject differs from baseProject in the following ways:
myProjecthas two additional tests,Generated Test Case 1andGenerated Test Case 2.A test input value in the existing test (
firstQuadrantTest) was modified inmyProject.
You can diff the two projects using the diff/merge tool as follows:
At the command line, enter the following to diff two projects
myProjectandbaseProject:polyspace-project -diff baseProject.psprjx myProject.psprjxThe command opens the diff/merge tool showing the two projects side-by-side in a tree structure. If the command fails for some reason, such as an incorrect option, the exit code of the command is set to 255 (if the command executes successfully, the exit code is 0). Note that the project tree structure that appears in the diff/merge tool contains elements that might not be accessible from the Polyspace Platform user interface (you can ignore those elements).
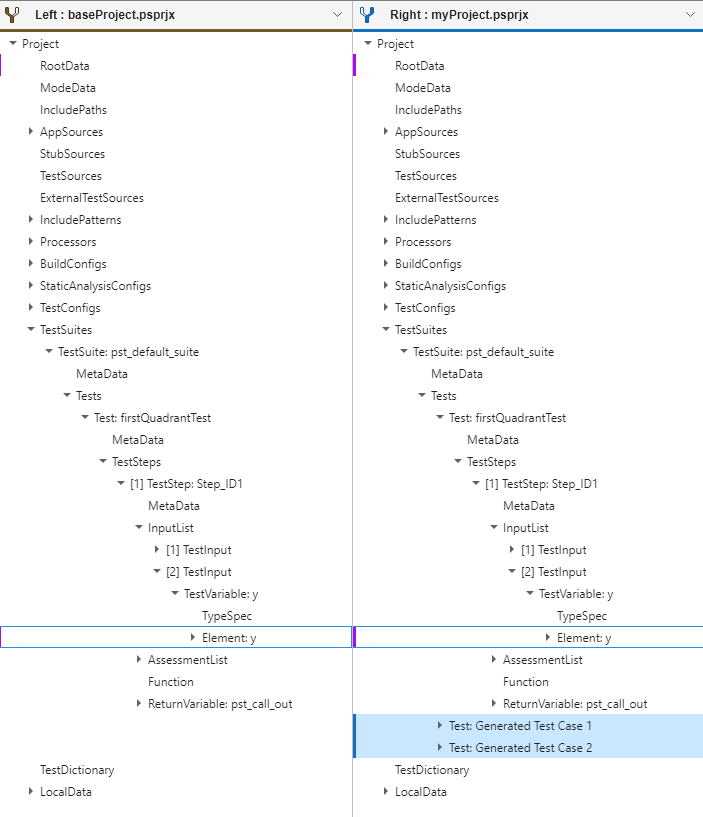
On the Comparison pane, locate the project nodes that were inserted, deleted, or modified:
Nodes that were inserted are highlighted on the right side.
Nodes that were deleted are highlighted on the left side.
Nodes that were modified have an indicator on the left. Click on the node to see what changed in the Property-Value section below the tree structure.
To see only elements that are different between the two projects, select Filter > Hide unchanged elements.
For instance, in this example, you see that:
myProjecthas two new nodesTest: Generated Test Case 1andTest: Generated Test Case 2, corresponding to the additional tests that were added to the project.The
Element:ynode underTest: firstQuadrantTestwas modified. If you click on thatElement:ynode, you see the change in the Property and Value columns below. In this case, the value of the test input variableychanged from 2 to 1.
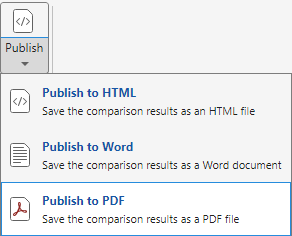
(Optional) You can publish the comparison results to an HTML, Word or PDF report.
To publish the results of a comparison between two projects to a PDF report, on the toolstrip, select Publish > Publish to PDF.
(Optional) You can begin merging the files by clicking the Merge Mode button on the toolstrip.
Merge Projects
Suppose you want to merge two versions of a project that are both based on the same version in the repository. The merge involves three versions of the same project:
baseProject.psprjx– Base version of the project in the repository.myProject.psprjx– Your version of the project. This is the version where you made some changes after checking out the base version from the repository.latestProject.psprjx– Another user's version of the project. Suppose the other user checked out the base version from the repository, made some changes and checked in their changes. This is the latest version of the project in repository.
Before checking in your changes, you have to perform a merge with the latest project in the repository, and resolve any conflicts. When performing a merge, you can choose one of these options:
Two-way merge: You see only your version of the project and the latest version of the project in repository.
Three-way merge: You see your version of the project, the latest version of the project in repository, and the base version that you started from.
You can merge the two projects using the diff/merge tool:
At the command line, enter the following to open the diff/merge tool and merge
myProjectandlatestProject(both created from base projectbaseProject):Here,polyspace-project -merge -target mergedProject.psprjx baseProject.psprjx latestProject.psprjx myProject.psprjxmergedProject.psprjxis the project that results from the merge, andbaseProject.psprjxis the base project which you changed.The command opens the diff/merge tool showing the three projects side-by-side in a tree structure. If the command fails for some reason such as an incorrect option, the exit code of the command is set to 255 (if the command executes successfully, the exit code is 0). Note that the project tree structure that appears in the diff/merge tool contains elements that might not be accessible from the Polyspace Platform user interface.
To see only the elements that changed, select Filter > Hide unchanged elements.
Nodes that were inserted in a version are highlighted in a specific color. Nodes where the entries were modified remain visible when you filter out unchanged elements.
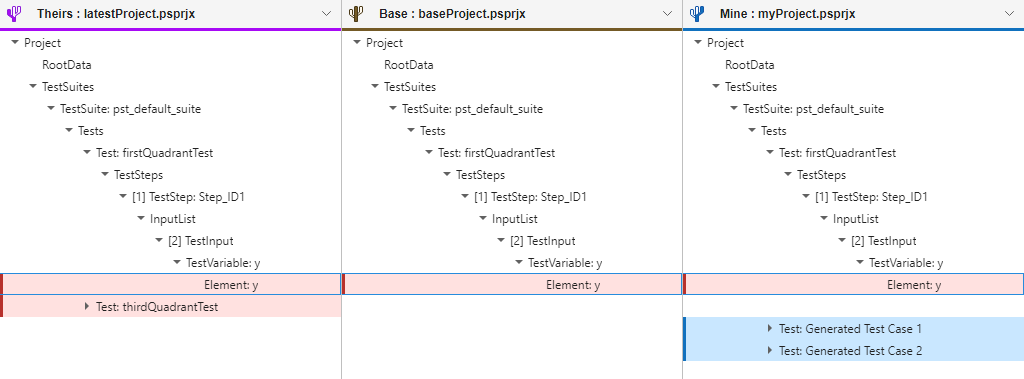
Focus on the leaf nodes in the unfiltered section of the project. For instance, in the three-way merge below, you can see that:
The
Element: ynode under[2] TestInputcontains modifications across the project versions.latestProjecthas one new node:thirdQuadrantTest.myProjecthas two new nodes:Test: Generated Test Case 1andTest: Generated Test Case 2.
In the Target section below the three versions, you can see the nodes that are included in the merged target file. The target file is initialized with the version
myProject(unless you use the option-auto, which initializes the target file with the result of an automatic merge attempt).For instance, in this example, you can see that
Test: Generated Test Case 1andTest: Generated Test Case 2, which are present inmyProjectbut not inlatestProject, are selected for inclusion in the target file.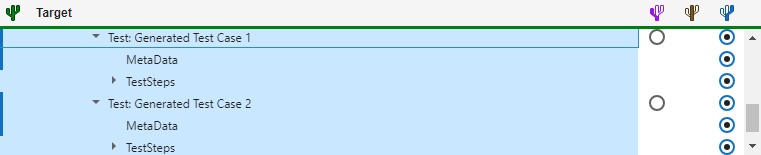
To see more details about the nodes that were modified, click the corresponding entry in the Target section.
For instance, if you select the
Element: ynode under[2] TestInput, you see the following: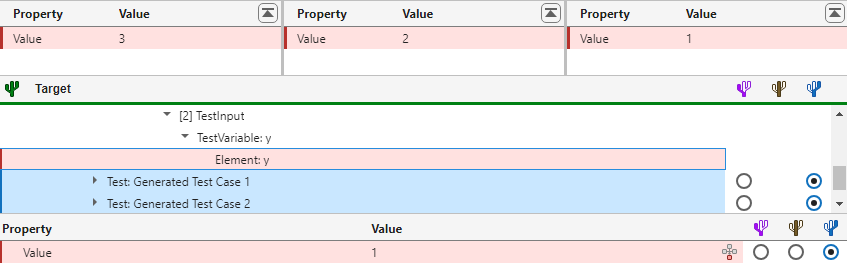
The Property and Value columns show the difference between the three versions. You can see that the test input
yhas the value 3 inlatestProject, the value 2 inbaseProjectand the value 1 inmyProject. In the Property and Value columns below the Target section, you can see that the value 1 frommyProjecthas been selected for the target file. If you want to accept the value 3 fromlatestProject, you can switch to that value by selecting the empty radio button on the left.After making all necessary changes, select Accept & Close. The target file
mergedProject.psprjxcontains the results of the merge.
Automatically Merge Projects
Instead of manually merging your project with the latest version in the repository, you can attempt an automatic merge of the projects. For instance, if your version of the project contains additional tests compared to the base version and the latest version in repository, an automatic merge can add your tests without affecting existing tests.
You can attempt an automatic merge in one of two ways:
Attempt an automatic merge without opening the graphical diff/merge tool using the
polyspace-projectcommand and the-auto-mergeoption.For instance, at the command line, enter the following to automatically merge the projects
myProjectandlatestProject(both created from base projectbaseProject):Here,polyspace-project -auto-merge -target mergedProject.psprjx baseProject.psprjx latestProject.psprjx myProject.psprjxmergedProject.psprjxis the project that results from the merge, andbaseProject.psprjxis the base project which you changed. Note that unlike a manual merge, in case of an automatic merge, you have to specify a base project.In case of merge conflicts, where the same project node differs across project versions, you see a warning at the command line and the merged project selects the node from
myProject.psprjx. Merge conflicts also cause the exit code of thepolyspace-projectcommand to be set to 1 (if the command executes successfully, the exit code is 0). You can automatically check for merge conflicts by polling the exit code. In Windows®, to see the exit code returned from the previous command, enter:In Linux®, to see the exit code, enter:echo %errorlevel%Note that if theecho $?polyspace-projectcommand fails because of reasons other than merge conflicts (for instance, because of incorrect options), the exit code of the command is set to 255.Perform a manual merge in the graphical diff/merge tool, but start the merge process from the result of an automatic merge attempt using the
polyspace-projectcommand with the-mergeand-autooptions.For instance, at the command line, enter the following to merge the projects
myProjectandlatestProjectstarting from the result of an automatic merge:Here,polyspace-project -merge -target mergedProject.psprjx baseProject.psprjx latestProject.psprjx myProject.psprjx -automergedProject.psprjxis the project that results from the merge, andbaseProject.psprjxis the base project which you changed.Once the diff/merge tool opens with the three versions of the project side by side, click Next on the toolstrip to jump to the first merge conflict. Select the version that you want to retain and continue to the next merge conflict by clicking Next on the toolstrip. For instance, in the example below, the node
Element: yhas a different value in all three nodes and the merge target has picked the value on the right (that is, the value in your version of the project). To pick the value in another version, select the radio button corresponding to that version.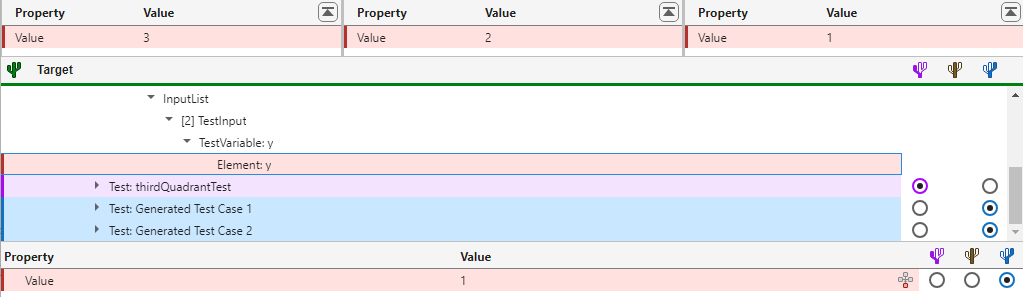
After an automatic merge, remember to verify and validate the resulting project. Modifications from different users that do not produce a merge conflict can still interact with each other and result in failing tests. For instance:
If a test has two inputs and you change one input while another user changes the other, automatic merge can pick both changes and result in a failing test.
If you remove a macro defined in a test configuration while another user adds a test using that macro, automatic merge can pick both changes and result in a failing test (or even a project build failure).
If you change the body of a test mock while another user adds a test assuming the previous mock body, automatic merge can pick both changes and result in a failing test.
To avoid such issues, following an automatic merge, run all tests and make sure that they continue to pass.
See Also
polyspace-project -diff, polyspace-project -merge