Servo Control Using a Gamepad Button
This example shows you how to use Simulink® Coder™ Support Package for ARM® Cortex®-based VEX® Microcontroller to control a servo motor using a digital button on the VEXnet Joystick.
Introduction
Simulink Coder Support Package for ARM Cortex-based VEX Microcontroller enables you to create and run Simulink models on a VEX microcontroller.
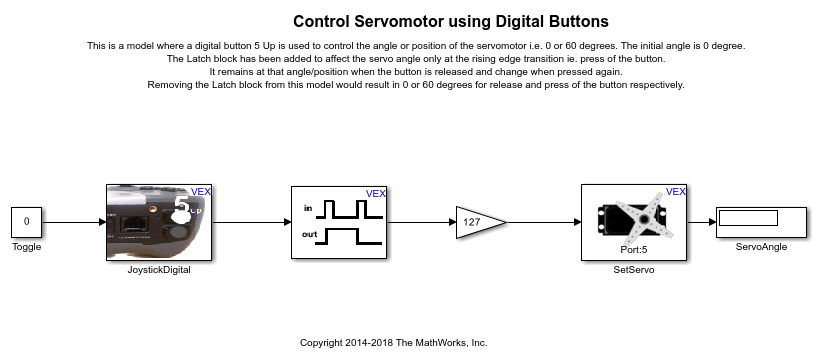
In this example, you will learn how to use a Digital Button on the VEXnet Joystick to control the angle position of a servo motor. You will also learn how to latch the state of the servo motor to a specific angle until the digital button is pressed (and released) again.
Prerequisites
If you are new to Simulink, we recommend watching the Simulink Quick Start video.
We recommend completing Getting Started with VEX Microcontroller Support Package.
Required Hardware
To run this example you will need the following hardware:
ARM Cortex-based VEX Microcontroller
VEXnet Joystick and VEXnet keys
Servo motor and Motor Controller 29
7.2V Battery
USB type A-Male to A-Male cable
Task 1 - Hardware Connections
1. Connect the VEX Microcontroller to your computer with a USB cable.
2. Connect the servo motor to the motor pin 5 on the VEX Microcontroller. Use the Motor Controller 29 cables to establish the connection between the motors leads and the pin on VEX Microcontroller. Connect them as described on Page 4 of the VEX Microcontroller and VEXnet Joystick User Guide
3. Connect the battery supply to VEX Microcontroller.
Task 2 - Set the Servo Motor Position Using a Gamepad Button
In this task, you will create a Simulink model that configures the digital button on the VEXnet Gamepad to control the angular position of a servo motor.
1. In MATLAB®, select HOME > New > Simulink Model.
2. Open vexarmcortexlib, and drag the Gamepad Button block from the Gamepad library into your Simulink model. Rename the block to JoystickDigital. Configure the Channel parameter to 5 and Button to Up.
3. Drag the Servo Motor block from the Actuators library to your model and rename it to SetServo. Configure the Motor Channel parameter to 5 and Button to Up.
4. Drag the Gain block from Math Library in the VEX Microcontroller library to your model Configure the Gain parameter to 127.
5. Connect the output port of the JoystickDigital block to input port of the Gain block. Similarly, connect the output port of the Gain block to the input port of the SetServo block.
6. Drag the Latch block from the Utilities library to your model and insert it between the JoystickDigital and Gain blocks. The Latch block holds on to the previous state value until the button is pressed and released again (i.e. a rising and a falling edge).
7. Save your model.
Task 3 - Build and Download the Simulink Model
In this task, you will open the Simulink model created in Task 2, and build and download it to the VEX microcontroller.
1. Make sure to connect the VEX Microcontroller to your computer with a USB A-Male to A-Male cable.
2. Open the Simulink model created in Task 2. A pre-configured vexarmcortex_button2motor model is available here.
3. In the Simulink model, go to the Modeling tab and click Model Settings.

4. When the Configuration Parameters page opens up, navigate to the Hardware Implementation pane.
Set the Hardware board to ARM Cortex-based VEX Microcontroller.
In the Target Hardware Resources section, set the Build options to Build, load and run to automatically download the generated binary file on to the connected VEX microcontroller.
5. Navigate to Solver pane and set the Solver to discrete (no continuous states).
6. Click OK.
7. In your Simulink model, go to the Hardware tab and click Build, Deploy & Start. The model will now be deployed to the VEX microcontroller.

8. Disconnect the USB cable from the PC and connect it to the VEX gamepad. Turn on the VEX microcontroller and the gamepad. Observe the position of the servo motor as you control it with the 5 Up button.
Other Examples
For example:
Create and run a model that controls the servo motor using a Gamepad button without the Latch block.
Create and run a model that controls a DC motor to rotate in a specific speed using a Gamepad button.
You can also select a web site from the following list:
Americas
- América Latina (Español)
- Canada (English)
- United States (English)
Europe
- Belgium (English)
- Denmark (English)
- Deutschland (Deutsch)
- España (Español)
- Finland (English)
- France (Français)
- Ireland (English)
- Italia (Italiano)
- Luxembourg (English)
- Netherlands (English)
- Norway (English)
- Österreich (Deutsch)
- Portugal (English)
- Sweden (English)
- Switzerland
- United Kingdom (English)