Exchanging WiFi Data and Using ThingSpeak with STM32L475VG Discovery Board
This example shows you how to use Embedded Coder® Support Package for STMicroelectronics® STM32 Processors along with the STM32L475VG Discovery (B-L475E-IOT01A) board to either send and receive TCP messages or send and receive data from a ThingSpeak™ channel. ThingSpeak™ is a cloud-based MathWorks® internet of things (IoT) analytics platform. For more information, see ThingSpeak.
This example uses the WiFi TCP Send and WiFi TCP Receive blocks for TCP messages and the ThingSpeak Read and ThingSpeak Write blocks to exchange data streams from a ThingSpeak channel.
The Wi-Fi® module on the STM32L475VG Discovery (B-L475E-IOT01A) board is 802.11 b/g/n compliant. For more information about this board, see STM32L475VG Discovery (B-L475E-IOT01A) Board.
Prerequisites
Complete the Getting Started with Embedded Coder Support Package for STMicroelectronics Discovery Boards example.
Required Hardware
To run this example you need the following hardware:
Wi-Fi Router.
The STM32L475VG Discovery (B-L475E-IOT01A) board provides a Wi-Fi module that can be used for data communication.
Hardware and Network Configuration
This section shows you how to configure the hardware and network properties needed to run this example.
The target models in this example are by default configured to obtain the IP address during startup using dynamic host configuration protocol (DHCP). However, you can also assign a static IP address to the target hardware.
Automatic IP Address Assignment Using DHCP
1. Open the Configuration Parameters dialog box for the target model included with this example.
2. Navigate to Hardware Implementation > Hardware board settings > Target hardware resources > WiFi and clear the Use static IP address and disable DHCP box.
3. Configure the following Wi-Fi settings:
Service set identifier (SSID)
WiFi encryption
WPA password
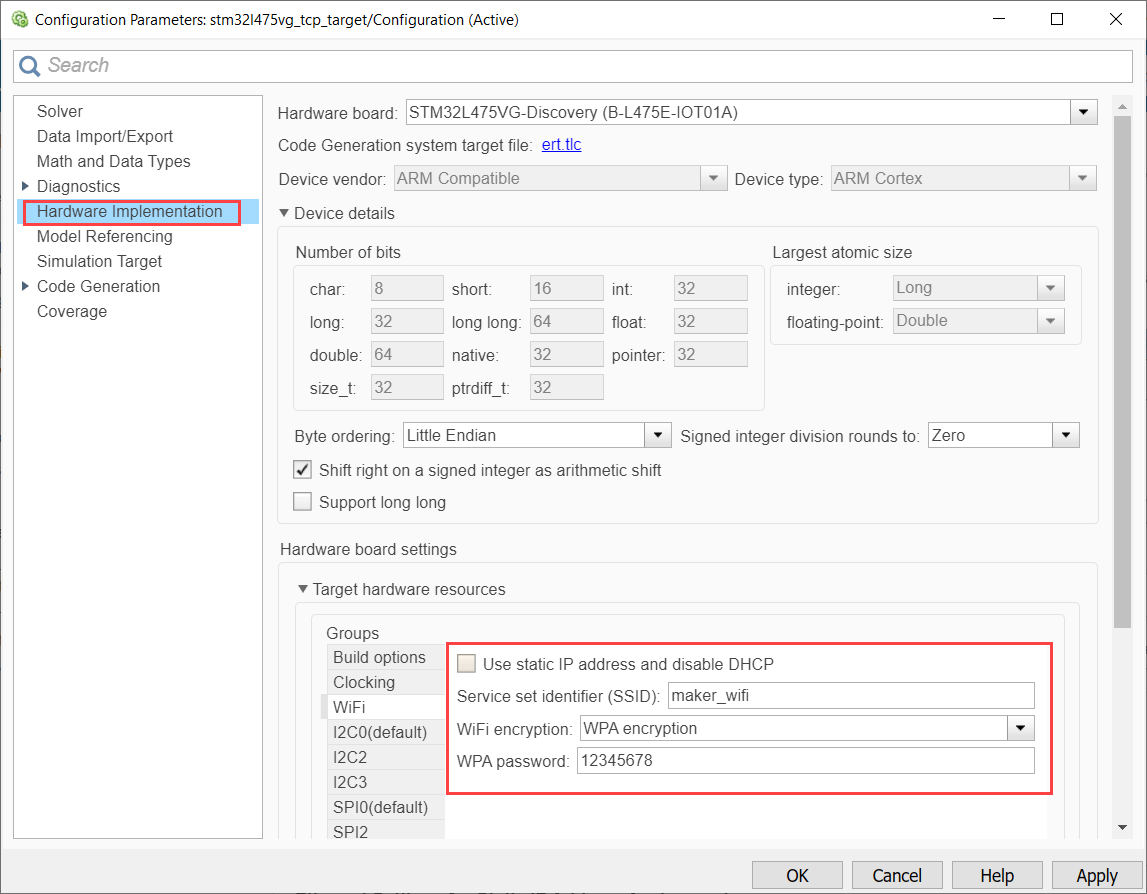
The target hardware now connects to the Wi-Fi router when you deploy the target model. After you deploy the target model, the diagnostic viewer displays the dynamically assigned IP address of the target hardware (server).
Static IP Address Assignment
1. Open the Configuration Parameters dialog box for the target model included with this example.
2. Navigate to Hardware Implementation > Hardware board settings > Target hardware resources > WiFi and select the Use static IP address and disable DHCP box.
3. Configure the following Wi-Fi settings:
IP address
Subnet mask
Gateway
Service set identifier (SSID)
WiFi encryption
WPA password
Note: Ensure that the IP address and subnet mask values are unique and appropriate.

The target hardware now connects to the Wi-Fi router when you deploy the target model.
Task 1 - TCP Communication Between Target and Host Computer
In this task, you will run the Model Fault-Tolerant Fuel Control System example on the STM32L475VG Discovery (B-L475E-IOT01A) board. The control algorithm runs on the target (STM32L475VG Discovery (B-L475E-IOT01A) board) while the host runs a plant simulation of the system. The target and the host models communicate via TCP. The target model receives the fuel system control sensor values from the host model and transmits the calculated fuel mixture ratio to the host computer.
Use this workflow for a setup where both the host computer and the target hardware (STM32L475VG Discovery (B-L475E-IOT01A) board) are connected to the same network (the host computer can use either ethernet or Wi-Fi to connect to the network).
Note: Multiple clients on the host can communicate with the target hardware board configured as a server only when multiple server blocks are available in the target hardware board.
Models

2. stm32l475vg_tcp_host - This model requires Instrument Control Toolbox™.

Run Model Configured for Target on Hardware
1. Open the stm32l475vg_tcp_target.
2. Configure the network properties for the target model as described in the Hardware and Network Configuration section.
3. Update the Local IP port parameter of the WiFi TCP Send and WiFi TCP Receive blocks available in the target model.
4. On the stm32l475vg_tcp_target, press Ctrl+B or on the Hardware tab, click Build, Deploy & Start to build, load, and run the target model on the hardware.
Run Host Model to Receive and Analyze Data
1. Connect the host computer to the network (to which the target hardware is connected) using either ethernet or Wi-Fi.
2. While the target model is running, open the stm32l475vg_tcp_host and update the Remote address parameter of the TCP/IP Send and TCP/IP Receive blocks in the host model:
If you are using a static IP address for the target hardware (server), set the Remote address parameter with the static IP address that you used for the target model.
If the target model used DHCP to dynamically assign IP address, it sends this address to the host computer via serial communication (using the SCI 0 module), which you can see in the diagnostic viewer. Set the Remote address parameter with the dynamically allocated IP address displayed in the diagnostic viewer.
3. Verify that:
The Port parameter of the TCP/IP Receive block in the host model matches the Local IP port parameter of the WiFi TCP Send block in the target model.
The Port parameter of the TCP/IP Send block in the host model matches the Local IP port parameter of the WiFi TCP Receive block in the target model.
4. Run the host model to establish a connection with the target model over Wi-Fi, send the simulated sensor data to the target, and visualize the response calculated by the controller.
Note: The host model in this task uses simulation pacing by default. You can customize this behavior by using Modelling > Run > Simulation Pacing.
Task 2 - Exchange Sensor Data with ThingSpeak™ Channel
In this task, you will collect the temperature and humidity data from the HTS221 relative humidity and temperature sensor as described in the Read Data from I2C-Based Sensors on STM32L475VG Discovery Board example.
This task sends this data to a ThingSpeak channel for analysis. In this example, the target model collects the same data from the same channel and uses the host model running on the host computer to display the collected temperature and relative humidity data.
The target model uses the ThingSpeak Write and ThingSpeak Read blocks to perform write and read operations to and from the ThingSpeak channel fields. The target model in this task uses fields 1 and 2 of the ThingSpeak channel. It writes the sensor data to the channel, reads the same data from the channel, and sends them to the host model using serial communication. However, you can configure the ThingSpeak Read block to read from a different set of fields or a different channel.
Models
1. stm32l475vg_thingspeak_read_write_target

2. stm32l475vg_thingspeak_read_host - This model requires Instrument Control Toolbox™.

Run Model Configured for Target on Hardware
1. Open the stm32l475vg_thingspeak_read_write_target.
2. Configure the network properties for the target model as described in the Hardware and Network Configuration section.
3. Open the stm32l475vg_thingspeak_read_write_target/Send data to ThingSpeak subsystem.
4. In the Main tab of the ThingSpeak Write block parameter window, enter the Channel ID and Write API key values.
To find the channel ID, complete these steps:
a. Sign In to ThingSpeak using your MathWorks account.
b. Select Channels > My Channels.
c. Select the channel to which you want to write the data. If a channel does not exist, create a new channel.
d. Click the Channel Settings tab.
e. Copy the channel ID from the Channel ID parameter.

To find the Write API key, complete these steps:
a. Sign In to ThingSpeak using your MathWorks account.
b. Select Channels > My Channels.
c. Select the channel to which you want to write the data. If a channel does not exist, create a new channel.
d. Under the channel that you created for this target hardware, click Settings.
e. Click the API Keys tab.
f. Copy the key from the Write API Key parameter.

5. Select the Enable field selection parameter in the Optional tab if you want to change the fields used for writing the data. If you select this parameter, you can specify the Fields of the ThingSpeak channel that you want to use. By default, the model uses fields 1 and 2.
6. Open the stm32l475vg_thingspeak_read_write_target/Read data from ThingSpeak subsystem.
7. In the Block Parameters dialog boxes of the two ThingSpeak Read blocks, enter the Channel ID and Read API key values.
To find the channel ID, follow the procedure described in step 4.
To find the Read API key, complete these steps:
a. Sign In to ThingSpeak using your MathWorks® account.
b. Select Channels > My Channels.
c. Select the channel to which you want to write the data. If a channel does not exist, create a new channel.
d. Under the channel that you created for this target hardware, click Settings.
e. Click the API Keys tab.
f. Copy the key from the Read API Key parameter.

8. Enter the Field number of the ThingSpeak channel from which the block should read the data.
9. On the Target ThingSpeak read and write model, press Ctrl+B or on the Hardware tab, click Build, Deploy & Start to build, load, and run the target model on the hardware.
Run Host Model to Receive and Analyze Data
Open the stm32l475vg_thingspeak_read_host.
In the Block Parameters dialog boxes of the Serial Receive and Serial Configuration blocks, select the COM port that is used for serial communication between the host and target models. You can determine the COM port using the device manager of the host computer.
While the target model is running, run the stm32l475vg_thingspeak_read_host to establish serial connection with the target model. The host model receives the temperature and relative humidity values from the target using serial communication (SCI 0 module) and plots the data in addition to displaying it.
Summary
This example introduces the workflows for:
Exchange of data between a host computer and target hardware over WiFi.
Exchange of sensor data between an IoT application and a ThingSpeak channel.
See Also
Read Data from I2C-Based Sensors on STM32L475VG Discovery Board
You can also select a web site from the following list:
Americas
- América Latina (Español)
- Canada (English)
- United States (English)
Europe
- Belgium (English)
- Denmark (English)
- Deutschland (Deutsch)
- España (Español)
- Finland (English)
- France (Français)
- Ireland (English)
- Italia (Italiano)
- Luxembourg (English)
- Netherlands (English)
- Norway (English)
- Österreich (Deutsch)
- Portugal (English)
- Sweden (English)
- Switzerland
- United Kingdom (English)