Developing EV Components Using Virtualization and Scaling to the Cloud
The rising demand for advanced battery technologies requires frontloading of battery development. In this talk, discover how to virtualize battery development by integrating high-fidelity battery pack models, including thermal and cooling systems. Then learn how to integrate this model into a virtual vehicle and scale the simulation in the cloud. While this talk uses a battery as an example, the workflow is applicable to the development of any other EV component.
Highlights:
- Create comprehensive battery pack models with thermal and cooling considerations
- Ensure model accuracy and performance through rigorous unit testing
- Integrate battery pack models effortlessly into the virtual vehicle framework
- Leverage cloud workflows for faster, resource-intensive simulations and testing
Published: 7 Dec 2023
So in this particular session, like Piyush mentioned, we are going to talk about the virtualization and scaling up the cloud. Now, before understanding what, virtualization, we mean by that, let's first understand a bit what industry is doing in this regards. So what we are seeing is that a lot of companies are adopting this virtualization, and you may have also heard the term called Virtual Vehicle.
But when we work with customers, we find that they define it a little differently, but on the use cases side, what we see is that a lot of people, they are relying on simulation now heavily. There is a trend of doing left-shift of the virtualization, so left-shift of simulation-based virtualization, which is also called as frontloading. But one thing that's common is that we are seeing this more often used in powertrain, vehicle dynamics, and ADAS teams, and the idea is to reduce the physical prototype as much as possible.
Here are a few customers that we have worked with-- Ford, then GM and Bosch-- and I have left the links so you can go and check what they did and how they did that. But one thing that you will understand is that because their requirements are so different, even the workflow that they are doing, there were-- the virtualization that they have done was quite different. However, there were some challenges that we found that they had throughout this, and I am mentioning a few of them which came up quite often when we worked with them.
And those were access to the right model fidelities-- now, what it means, as you can understand, let's take an example of maybe having a team who is working on the vehicle dynamics or the powertrain. You would understand that they have different requirements of the models, right, and also the amount of physics that they needed and the software that they wanted to integrate were different.
[INAUDIBLE]
Do you want to check something?
[INAUDIBLE]
No, it's fine. It's fine.
[INAUDIBLE]
OK.
[INAUDIBLE]
Does it work? Oh, great. I'll come back to this.
Yeah, and one of-- another use case that we heard was this, the deployment of the models. Now, one thing that we understood when we were talking to our customers is that they want to make these models accessible to as many people possible throughout the organization, and one thing that was quite notable was that they don't want everyone to develop the models-- rather, use them. What do I mean by that?
So imagine there is a team who just wants to understand, if I change a component, how much does my range change? For them, he doesn't want to develop the model, but he would want to give some input and get some outputs. And one thing that we also understood is that, for that to happen, we can also leverage cloud there by deploying the models onto cloud, and you can host it in your internal server, where a user can send the data, then get the model results, and then just work on that.
OK, I'll move the slide, hoping that it doesn't blink again. It doesn't. All right.
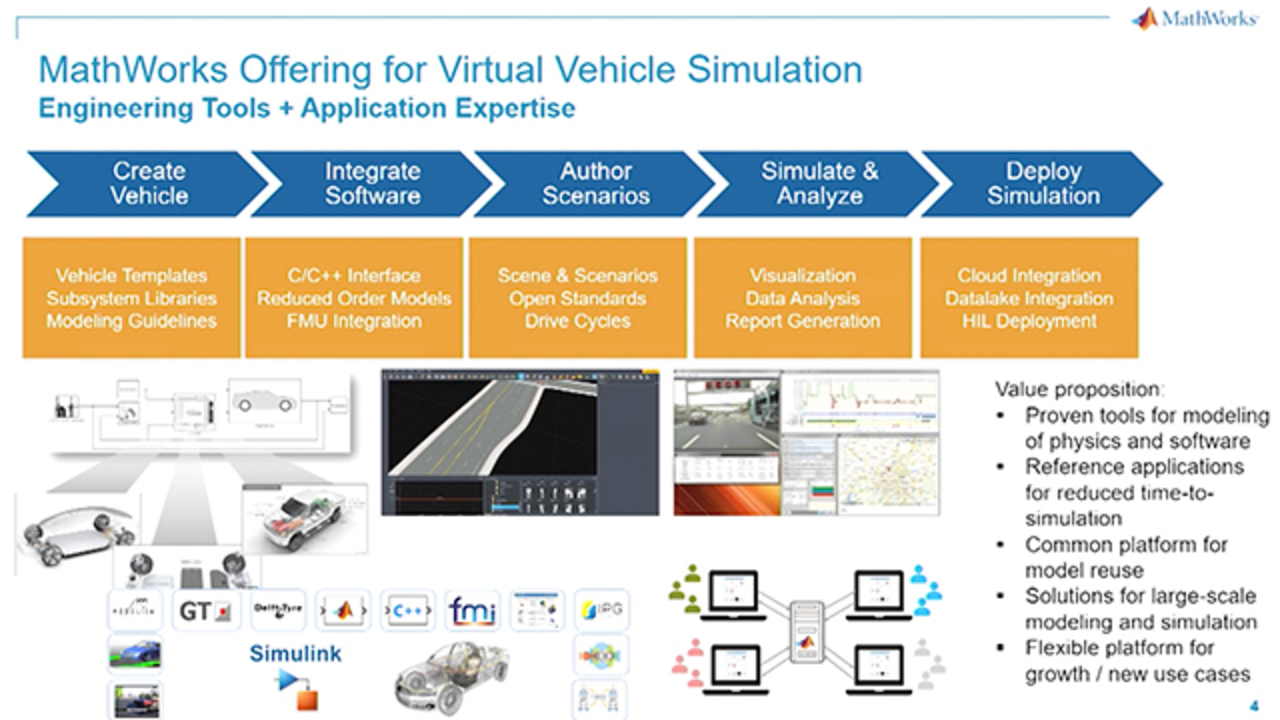
So while we were working on this and we were also addressing those challenges, MathWorks Development Team has also focused on a few of those things to make this virtualization journey as simple as possible, and this is how our team is helping with the engineering tools and the expertise. The first and foremost thing is, of course, the vehicle development itself, the modeling.
So continuing, the first thing that we have tried to do is to help you with the model creation, and one of the things that we are doing is we are helping by providing you prebuilt models in the library-- I'll show you one example of that-- and which are built using modeling guidelines. And the expectation is that you would use those models to get started, so there are fully built and customizable vehicle models that are present that you can use to get started in case you don't have anything like that.
And now, once you do that, we also understand that you may already have some components that are already built, some legacy code or models that you would want to integrate. So we are also quite invested in that, and we are giving you these various options like C/C++ interfacing; then reduced order modeling, workflow for that; FMU integration; and at the bottom of the page, you can see a very small snippet of the partners that we have, with whom we have either just function-based interfacing or FMU integration.
So the expectation is that within these two, you should be able to create your own vehicle model, and in case you have something that you have already built, be it software or be it components, you should be able to integrate them. Once that is done, the next step is, definitely, create some scenarios where you can test those models.
Now, I am showing you a graphical scenario. You may have seen this outside. There is a demo about it. This is something that you can look at, but you may not need the 3D all the time. So you could still do standard tests like open standards and drive cycles, and for 3D, you can look at scene and scenarios.
And then finally, the next step would be to simulate analysis results and then do report generation. Now, you can either do it at the desktop level, at one instance, or you can integrate cloud, use the power of that by doing a lot of simulations in parallel and offload a lot of work, as much as you can do, onto cloud. And the benefits that you will get is that, first of all, the models that you are helping with are open, customizable, so you can always integrate your own. And it helps you with doing a lot of reusability, and we are also keeping mind in the large-scale simulation aspect of it.
So now that we understand how we are ready to help you with this journey, let's take one example, which is the classic problem statement that our electrification world has, which is that we want to reduce CO2, and for that, one of the solutions that is working very well is battery electric vehicles. And the idea is that it will help us in localizing the energy production, so localizing the emissions to the energy production sources, and we can also use a lot of renewable energy.
However, there is one key challenge, and this is an engineering challenge that needs to be handled, which is the energy density. If you consider, with a full diesel tank of 70 liter, the power and the range that you get, it's very difficult to have something equivalent from the battery system, right? So to really address this, as you can understand, if we really want to build something sustainable, the lithium ion battery has to be very efficiently decided and chosen.
So what we are doing today, we are taking an example, how virtualization can help any organization to build this kind of system an efficient powertrain, right? And for that, I am representing the system engineering team, and the goal that we have here is that we want to build an efficient powertrain. And we also want to test it and understand how much simulation can really help to really understand what's going to happen.
So for that, my objective is, one of the targets that I have is range estimation, and with the help of that, I also want to do the right component sizing. And a few of the test cases that I need to consider is the effect of environmental conditions on the range, and then try to test it against various drive cycles, right, and the deliverable that I have is a model, a system-level model of the vehicle where I can quantify the vehicle range then do battery performance and then cost analysis. Now, here comes my colleague, Sree, who has different goals.
So I represent the head of our COE and IOE, because we look into different departments, and here are a few departments or teams that I usually work with. What you're looking at is three different teams. First team is the Battery Team, whose prime goal is to build battery packs to understand normal behavior [INAUDIBLE] all those aspects.
I also work with the E-Powertrain, where they model motors, again, for the normal behavior. Now, there's another team called Thermal Management. What this team does is they pick the battery and the motor model, they put it together with the HVAC system, and they look into the refrigeration circuit, all those control algorithms or analysis.
Now, my prime objective of these teams individually is looking into the thermal aspects and then the control algorithms, but as head of COE, my interest is also to understand how each of these subsystems, when put together, how do they perform. And I want to understand those aspects, so I would like to have a framework where I can have a unified platform to test or simulate all these models. So I would want to hear from Abhishek if there is any solution for this where I can have something unified.
Yeah. Yeah, so one of the things that we have been helping with is that-- now, Sree mentioned how she wanted to also have a unified platform where all these models could be put together. Now, one of the benefits or requirements that I have is that unless I get these detailed models, I won't be able to do an accurate prediction of my battery performance or the cost, right? So I need to have a way where I can integrate all of these, and that's where cloud-based source control and all those things will come in.
So in my case, what we are doing, while I'm creating the model, I'm making use of GitHub, and my entire architecture model, whatever I'm building, will be available for all of the teams to use. So the expectation here is that they will build their model, but for their models and their components, they would make sure that the interfacing is chosen, however it was done in the system architecture, so that when they have a component which is a relatively good representation of the actual thing, they should be able to integrate, or I should be able to take it and then understand if there is some sort of iteration that needs to be done with the requirement itself.
So just to recap, these are the test cases that I'm looking at, and as you can see, we are also considering cabin conditions and then environmental effects, right? So I need my HVAC model also to that level. So then here comes the agenda.
So what we're going to do today is we have four sections. The first section is where I will show how I created a vehicle model using one of the tools, called Vehicle Composer. Some of you may have seen it already. And the idea is I will use that model to do the initial range prediction-- or, rather, a component sizing activity where I will do some optimization to understand what sort of battery sizing I have to do. And while I do that, Sree will be talking about how the Battery Team, E-Powertrain, and the Thermal Team, how they were working and were creating the model.
So let's go step by step. So the first thing, some of you may have already used it, and so this is the Vehicle Composer app that I was talking. And what you can do here is that, basically, once you start off a new session, you can tell what sort of powertrain you want.
Now, this is an active development phase for MathWorks, and right now we have four-wheelers and two-wheelers. And you can see the selections of powertrain architecture that you can make, and so you can choose various forms of hybrid or electric. And then you can also choose the technology, so Simscape or Simulink. You have both. And once you have done this selection, you can say Configure, and then it will populate all the subcomponents.
Now, once the subcomponents are populated, you can then create some-- give the values of various different subsystems, choose a controls algorithm, and also create test cases. So we do that, and then once we select-- there are various different options. I'll encourage you to have a look at that. And you can also see that it is possible to get an FMU if you have directly imported here itself.
So now, once you have done that, and so what this is doing, this is picking up all the key components that-- or, rather, key parameters that you would want to parameterize at this stage. This is not an exhaustive list. The blocks would still have a few more components, but based on our experience, we have selected a few of them that are available here. And here-- I was talking about the drive cycles-- so here you can either create drive-cycle-based scenarios, or if you have selected Longitude-- sorry, Lateral Model, you can also define the lateral simulations here, like a switched sign, or double engines, like that.
Now, once those things are done, you can say, create a vehicle model, and what will happen, basically, is you will end up with this model. And in this model, what we have, so the first section is the drive cycle and the environment. That is where you can set your target and ambient conditions.
Then we have a driver model. If you have selected longitudinal, then you'll get the longitudinal driver, but if you had also-- we also have lateral dynamic-- sorry, lateral driver as well. That can also be included.
Then controller subsystems, we have followed Bosch open architecture to give you application-layer implementation to make the vehicle work. It has some implementation, but I would encourage, if you have something, a controller that works for you, replace these with that. Then finally, the vehicle, passenger car itself, this is where all the vehicle parameters that I have initially showed will go in, and then we have the visualization.
So once we have all those things, so this kind of works as the foundation of the system model that I want to work with. And then I will take that, and my idea is I want it to also resize my battery. So for that-- back, back. We'll come to it.
So for that, the way I'm doing it is that I have various different scenarios, various different parameters, and some responses that I would want to measure and use it to calculate the metrics. The metrics are the energy consumption and estimated range, and I want to do a trade-off of that. And we would like to iterate by doing different choices.
So in my case, if I explain the example, a little detail, so what we'll see is that for the goal, we have the battery sizing. Now, what I mean by battery size, this is basically how many number of cells I want them to be in series and parallel, Ns and Np. That's what I am trying to find out, and this would affect the overall vehicle mass.
And we have also selected one of the system parameters, gears, and then I have defined the constraints, the design variables. And in my case, to show range, I have selected energy consumption rate as an indicator, and here I'm showing you all the other constraints and the design variables that I have.
Now, one thing that I have also done, because this is going to be multiple simulations for the estimation to work, we converted this entire model simulation to function calls so that we can make quick calls and use fast restart or Accelerator mode to get quick results. I'll leave this script here. You can have a look at it, how things are implemented here.
But finally, this is something that I got. In my case, I used surrogate optimization because it was a little faster in doing this kind of model, but that's the result that I got. The initial model that I had, the baseline model that I had, it was meeting few of them but not all of them. But after the optimization, I got this result, and as you can see, it took 2.5 hours, 200 function calls. And this was done serially. I have not used any parallel processing yet.
Now, while I was doing so, I also-- so these were the few system-level tests that I wanted to do, and they were, like, AC on and off, and then various humidity, temperature, and elevation conditions that I wanted to check. But for that, the models that I considered, it didn't have this physics yet, so that's where, now, I will hand it over to Sree again and hear how she went about it. Over to you.
So let's try and understand in a bit of detail about what each of these teams are doing, so I'll start with the Battery Team. So the Battery Team, the idea is that they want to kind of build a battery pack here and try and test it out for one particular scenario where the temperature of battery will significantly increase and, to cool the battery down, we'd have a liquid cooling system. So that's the approach that this team is looking into, and that's what we are also going to explore.
Now, we have kind of used Simscape Battery to quickly build the battery pack and set it up with a liquid cooling system and perform a fast-charging scenario here. So again, this is something that we have spoken about previously. Like, a couple of weeks ago, we had a webinar, and we had literally spoken about that. So I'll quickly run through a few things, but there are links where you can go and look into all those intricate details.
But let's start and understand how we can quickly use Simscape Battery to build your battery pack and do further analysis. So what is Simscape Battery, for someone who's not aware? So Simscape Battery's an add-on product to Simscape, and the idea behind having this Simscape Battery is to kind of quickly build a battery-pack model with its thermal characteristics, and then couple it with the thermal management system or a battery management system and further perform analysis.
In our case, also, we have done something like that. We have taken a battery pack of a certain configuration that my systems engineer Roy has given. He had kind of mentioned that these are the cells in series and parallel. And I try to figure out how many modules I would want to work with, and then I want to couple it with the thermal cooling plate here.
Now, this is the configuration I'm working with. Again, the details of how this range simulation is performed is all available over these links here. So where do I start? Now I have the configuration of the battery, where exactly do I start?
So let's try and understand this basic workflow here. So we start from cell modeling. We look into how we can model single cell, and then scale that single cell to a battery pack. Now, also looking into, do you work with default cells or can you parameterize it, that's one thing that we can look into. And then we couple it with the liquid cooling system here.
So when you look at Simscape Battery, we have a cell module, which is a table-based module, again. The idea here is that it basically works on the electrical circuit model. It is coupled with the thermal system. For example, if you look into the equivalent circuit model here, the power loss generated from the equivalent circuit model is fed back to this thermal module with the thermal mass, and then it calculates the heat dissipated in that we connect it with the environment or with the cooling plate. So that's the idea here.
Now, this might not be enough. You might have your own kind of battery model, for example. This does have fade dynamics and then calendar aging, all of that, but you might be having other features included. So Simscape Battery has customization included in it so you can use Simscape language to bring in your models also and work with them.
Again, we have a few preparameterized blocks that you can quickly use. And in our case, I was lucky enough to have this configuration that Roy had mentioned to me, and I quickly selected that model. And you know I'm good with my cell model here.
Now, in case we don't have this kind of cell model, what do we do? That's when a parameterization of the cell models come into picture. Again, I'm not going to go into details of this because we have spoken about this many times in the past, but let me quickly brief about what we are trying to do here.
So we had this electrical circuit model with the RC component values, right? So the idea here is we take this model, run a simulation on it, perform the simulation with the different charges per cycle or HTTP cycle, and then we try to compare the simulation results with the measured results and perform iterations until the components here are parameterized so that the correlation is to our requirements.
Now, to do that, we use something called as Parameter Estimator. As you can see, that is measured and simulated data. If I quickly go-- oh. Oh, OK.
So the idea is you have measured data and simulated data. Initially, it didn't match. It didn't have the right set of parameters.
Then we performed this optimization algorithm in the background. The app does that for you, and then you see that the components are parameterized to your requirements. You take these, put it in your cell, and then use it for your pack modeling.
So that's how your cell is ready for you to work with. Now, once you have the cell, you can quickly use something called as Battery Builder app, which will allow you to take the single cell and then couple it or scale it up to a parallel assembly, to a module, and to a pack. It has, the app has, the capability of giving information in terms of geometry, thermal capabilities, and all of those.
Now, this is what I've used. I've used the app to kind of build a battery pack for my requirements that will match the number of cells in series and parallel in the module that I was looking at. So once you generate the model out of this battery pack, what essentially you get is a library of this battery pack. You can use this library and plug it in with your VMS or your thermal system here. So that's the idea.
Now, this is an app-based approach. You can also look into a script-based approach with Simscape Battery API. So I've used the Battery Builder app to kind of model my pack here. I have four modules here with 96 cells in series and 32 cells in parallel.
Now, this is how my module would look like. Of course, I have a very detailed battery model here now. At some point, I'll also consider some thermal characteristics in it.
Now, when you have such kind of detailed battery model, what happens is you have to choose between speed and precision. So if you're looking at a detailed battery strategy, what exactly happens is each of these cells will have its thermal and electrical components, which makes it very precise model, but then you're compromising on the speed.
On the other hand, you can have a lumped battery pack, saying that there is one thermal and electrical component for just the entire pack. Here, it will be fast, but you're compromising on precision. The in-between ground is nothing but having some kind of group strategy where you couple it with a group of cells and then you have this model ready for you. In my case, I've gone with this group strategy, so you can see I've grouped each of these modules into four groups each. So I have a 16, or a four-cross-four module available here.
Now, the same strategy applies to your cooling plate. You have the battery pack which you have chosen for your right fidelity. You would also have to take your cooling pack and discretize it along different x and y directions to kind of match that configuration here.
So the same strategy of fidelity and simulation times works on the cooling plate as well. So what I've done is-- and again, gone with discretizing the cooling plate along x and y direction, and it kind of looks very similar to my battery pack. It has four-cross-four group of cells, so together, we are looking at 16 cells-- sorry, 16 modules of the battery pack and 16 modules of the cooling plate here.
So that's how it looks now. What I had done is I created the battery pack, right? So I bought that battery pack, and now I'm trying to run a fast-charging scenario here.
So this is how the Battery Library looks like, and inside, you can see there are four modules, as I was speaking of, and then it's coupled with the thermal cooling plate. There are many different thermal cooling plates, like H-shaped, U-shaped, and parallel channel. Here, I had gone with the parallel-channel cooling plate methodology.
Now, these are some outputs that you can visualize on the root side of the model, so the cell state of charge and thermal values can be used later on for other activities. Now, to charge this battery, I need a current, or C, rate controller, right, so that's where I have a block where it takes the state of charge of these cells and the temperature of each of these cells and uses a lookup-based table to kind of quickly tell for this state of charge and temperature what would be the battery current.
Now, that's for how you-- now that value goes back to the battery pack, saying that this is how you have to charge the battery. Now, once it quickly charges, I also want to look into the aspect where the temperature is being measured. I want to see-- if the temperature is very high, I want the coolant to quickly flow in and cool down the system, so I have this module here to kind of control the temperature of the battery.
Now, with this setup, I want to perform a simulation, and I've done a simulation. I want to quickly walk you through the results here. So this is how our battery pack and the cooling plate was looking. We have a four-cross-four, total 16, group, right?
So my cooling plate as well as the battery started at a temperature of 40 degrees, let's say. They're pretty hot. So ideally, when I'm trying to charge these, the coolant should quickly flow in to cool the temperature of the battery pack. Let's see if that's happening.
So here in the simulation, you can see, when it's quickly charging, the temperature is significantly increasing. And then the coolant flow has shot up, and it's trying to cool down the battery and the coolant plate here. But you can see that the battery is cooling at a slower rate than the coolant plate.
That's because your coolant has quickly moved on to the channels but it has not reached the battery pack yet. So it takes some time for it to reach or cool down the battery, and that's what is happening. So once it has identified a temperature of around 30 degrees, it stops cooling the battery.
So that's how fast charging is affecting the battery and then the thermal model is coming down to control the battery model here. So this is, in a nutshell, what my Battery Team is trying to do. This is one scenario. There could be other scenarios like performing short-circuit test on the battery and other ones.
Now, coming to my other team, E-Powertrain, the Motor Team, this also works on something similar. It tries and builds this PMSM motor model with its inverter. And if you can see, there is a battery component also modeled here. So the idea is it uses the battery component from the Battery Team then has that motor inverter model setup.
As you can see, there is a thermal model also incorporated within this motor inverter model. The idea is to kind of see, on the go, as the motor is running, I want to understand what's the temperature of the windings of the stator and the rotor, to quickly see that-- I've just logged few signals, and you can see how they both started at the same temperature. But then over time they have kind of changed the direction here. This is what my motor team is doing.
Now, Thermal Management Team, they have spoken to, let's say, Motor and the Battery Team. They have taken the motor and battery and then integrated it with the entire HVAC system here. So the idea here is they have this four-way valve which basically decides when the coolant should flow, based on the temperature of the battery and the cabin here.
So if it's too cold, it would want the motor or the heater to quickly generate heat and warm up the battery. That's through one flow of the coolant, and if it's very hot, if the battery is very hot, it wants to cool down the battery. So then it will just switch the valve to a parallel channel, and then the radiator and the chiller comes into the picture.
Now, I try to log that as well and see here-- so I've performed a simulation where I'm trying to increase the speed significantly and trying to see if the battery and the other components are raising the temperature or not. As you can see, they all started at 30 degrees, but then they're significantly raising the temperature. And here in the valve commands, you can see the parallel channel, the chiller and the radiator, they-- whenever it was required to maintain the temperature, they've just shot up and then they-- serial to parallel mode has switched on. And this effect can be seen in the temperature there. So that's the idea, an overall picture, what the Thermal Management Team is trying to do.
Now, on the component level, these are a few tests that each of these teams were doing. They can be scaled up to different, as I was speaking of, short circuit and other tests. My interest, as I was speaking of, was also to understand how I can use all of these models onto a system level and see or understand how this really affects the entire vehicle system. So over to you.
Thank you, Sree. And I think by now it is pretty clear that the models we are going to work with is quite heavy to simulate. And then here comes my dream of having simulating everything together, so let's see how that goes. Now, so what we did was we created a few test cases. We put them, all of them together, and then here is a snapshot of a few of those test cases.
The first thing that I did was, of course, the first thing, the model, the vehicle model that I had, I had all the subsystems already built, so I could plug in all of those in that big model. And then I did some individual parameter sweeps and then some combination of that. And if you see, basically, that's where I have written down like where I want those variables to be, what sort of values I want them, and I have used a product called Simulink Test to do this. So what you're seeing here is Test Manager. So I created all these tests-- so Parameter Sweep, then a combination of them, then various drive cycle tests, and then battery-pack-specific testing, and then I moved on.
So the first thing, what I did was to really understand I needed a baseline, and for a baseline, these are the conditions. So ambient was 30 degree and with 0.4 relative humidity; cabin temperature, 25; drive cycle, and one passenger, and here is the result. So I'm showing this snippet to give you an understanding that whatever Sree was doing, I still am doing it, on the left-hand side, or your right-hand side, and then here you can see how temperature was very-- I have put a smaller section so that we know that we can see, for visualization purpose, but the inter-rate, 1,800 seconds, has been simulated here.
Right, so this is one test case. So these are all the things that we got, and just, this is a sanity check that I'm doing. And then here comes the test results. I have not put all of them, all those 13, 14 test cases that I had. I'm showing you one result to give you an idea.
So here is one result where the ambient temperature was 45 degrees, and at the bottom, what you see is that the total energy consumed by the HVAC. And you can see the red line is the new simulation, and the blue line at the bottom, with the boundary, is the baseline. There's a huge difference, and it affects the range.
So in my case, in an ideal situation, I would've got 233. This is, like, when my battery SOC is, like, around 70%. So that's why you see the prediction. In baseline, while in this situation, I was having 233.
Now you can see I'm, like, at 192. So it's significantly lower, and you can see where that is coming from. And similarly, in another test case, where I also now have high humidity, and here also I see similar things. Like, again, the thermal system asks for too much energy, a good amount of energy, and the range falls.
So now, as you understand, these models are quite heavy to simulate, right? So one of the things that I did, all the test cases, because they were not really dependent amongst each other, I could parallelize them. And the way I did it-- some of you may be familiar with the code-- so basically, you had the batch comment, but in my case, what I did, I used something called a Simulation Manager.
And in Simulation Manager, what you can do-- it gives you a front end where you can see how all the simulations are happening. Let's see if I can show you the video. So basically, it's a visualization where you can see how the codes are being allocated and which pool is being used and how the simulations are running. So this is particularly handy if you're doing this kind of simulation and you can check individual status of the individual system, and then you can understand.
All right, so this is how the visualization will look like, green, and then red if it fails. So, right, so finally, let me do a quick summary of what we saw. So we started off with the Virtual Vehicle Composer app.
Now, the idea is this should give you a model, full vehicle model which can be used by various other teams. And then what we did was we tried to use cloud also for working across departments as well as use a high-performance compute, if it is available. Now, these HPCs could be in our premises, or we can use AWS and other services as well. The demo booth's outside, which talks about it, so I will encourage you to go and have a look at that.
So here is a very quick overview. Interested in learning more, please meet outside. We can talk about it on all the individual steps in detail.
But before that, I would also like to highlight all these links where you can get in touch with us, with the requirement, and then we can help you with trials and evaluations. We have been doing this, a lot of you know already. Then we have our local consulting team who can help you in also getting a jump start, and then we have our training services and technical support. So thank you so much for your time. We took a little bit over, but I hope that's fine.
Related Products
Learn More
Featured Product
Simscape Battery
Up Next:


Related Videos:


Select a Web Site
Choose a web site to get translated content where available and see local events and offers. Based on your location, we recommend that you select: United States.
You can also select a web site from the following list
Americas
- América Latina (Español)
- Canada (English)
- United States (English)
Europe
- Belgium (English)
- Denmark (English)
- Deutschland (Deutsch)
- España (Español)
- Finland (English)
- France (Français)
- Ireland (English)
- Italia (Italiano)
- Luxembourg (English)
- Netherlands (English)
- Norway (English)
- Österreich (Deutsch)
- Portugal (English)
- Sweden (English)
- Switzerland
- United Kingdom (English)