Master Class: Scenario-Based Virtual Validation for ADAS Features
Automated driving spans a wide range of automation levels, from advanced driver assistance systems (ADAS) to fully autonomous driving. As the level of automation increases, the need for testing these features on multiple scenarios becomes important and the testing requirements increase multifold, making the need for modeling and simulation more critical. Creating virtual environments in the form of scenes and scenarios along with a testbench is important to achieve effective simulation.
In this session, learn how RoadRunner and RoadRunner Scenario™ can help you design scenarios for simulating and testing automated driving systems. See how to incorporate scenarios in a closed loop with algorithms for testing automated driving systems.
Discover how to:
- Interactively author scenarios by placing vehicles and paths, defining logic, and parameterizing scenarios
- Export and import scenario and trajectories to ASAM OpenSCENARIO®
- Programmatically create scenario variants from seed scenarios
- Set up scenario-based validation of ADAS features like highway lane change
- Set up a test automation framework for virtual simulation
Published: 7 Dec 2023
In the last session of the day and today, we want to give a quick overview on scenario-based validation. I think a lot of you have talked to us in the booths. And we've had two different sessions before. The first one, where Naga and Ananthesh talked about the open simulation interface for automated driving using RoadRunner. The second one where Deva and I talked about co-simulation of car maker and RoadRunner Scenario with other middleware and other environments.
So if you haven't got the message already, RoadRunner Scenario can simulate automated driving environments and can create impactful scenarios and help you simulate your tasks. So how do you really take these simulation environments and use RoadRunner Scenario to leverage the different simulation environments that you have?
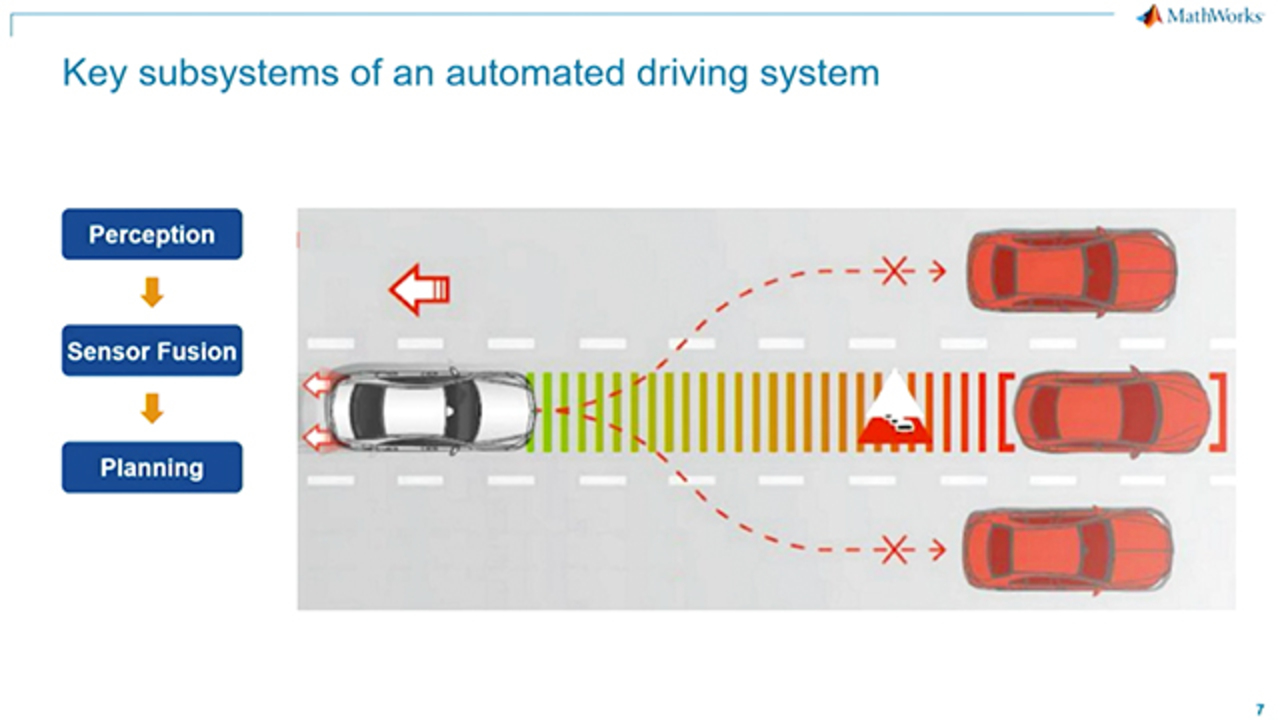
Now, we live in a time where you can actually leverage computational power from high-performance computing machines and actually simulate automated driving algorithms within the simulated world. So let's look at-- let's break down the automated driving algorithms and actually think about, what does it take to build an automated autonomous driving algorithm?
First, there's a perception part. So the perception part involves having multiple sensors and actually identifying what the sensors see. So here, the camera might see the different objects and identify classes, like vehicles, and pedestrians, and signals. Radars are really good at identifying metallic objects and specifically objects that reflect those frequencies.
LiDAR is really good at giving you depth information and details of the shape. However, it's slow in processing power-- sorry, processing speed. So you have different sensors, which have the strong points. And you rightfully will have a combination of these different sensors. And quite often, you have multiple, different sensors on the same vehicle as well.
You need a perception algorithm to get all of these sensors to identify the environment accurately. Now that you have multiple sensors giving you multiple information at different kinds of information, it's important to have some module to take this information from different sensors and then make a unified sensor out of it. And that's where a sensor fusion algorithm comes in.
A sensor fusion algorithm takes the information from four or five LiDAR-- or sorry, four or five radars, or two or three cameras and maybe one LiDAR, and actually tells the rest of the modules on reducing the ambiguity between the difference in data. So how do you take the radars, which are looking all around, and the camera, which is looking in one place, and then narrow down to the fact that all of these sensors, which are placed in different locations in the vehicle, are actually pointing at the same object. That's sensor fusion.
Now, after you've completely understood what the environment is doing, you've got a planning module, which tells what the vehicle should be doing. Let's say you've identified that there is a pedestrian in front of you. It's important for a planning module to identify that now you need to brake or go to the left or right to overtake.
And then, you have the controls module. Now that the planning module has told you you need to follow a particular trajectory around the pedestrian, what is the right steering and acceleration, deceleration values to follow that particular path, and the trajectory, and the speed profile in that particular path? It's a pretty complicated statement, given the fact that all vehicles are different.
So all of these different pieces are very important, crucial parts of autonomous driving systems. And it's important to get all of them right. And here's an example where all of these come together. And in fact, if you look at this particular example closely, it's impactful because the pedestrian isn't actually visible to the camera on the vehicle when the car on the right is going. So the pedestrian is actually occluded. So the vehicle doesn't know until the last minute that there's actually a pedestrian in front of the vehicle.
And so the vehicle actually puts a brake. In fact, initially, it's able to identify. And then, the car comes and occludes. So the vehicle doesn't know where the pedestrian is for some time. And then, again, the pedestrian comes back into the frame. So you have all of these different modules where the camera, which is running the perception module, identifies the environment.
The sensor fusion, it takes the multiple camera and the radar information and identifies a depth of the different objects in the scene. The planning module identifies that you need to accelerate or brake a certain instance. And the control modules finds the required acceleration brake for the planning modules.
However, for these algorithms all to work well, the industry widely regards the fact that you need about a million kilometers of validation. And this is not going to happen in physical testing. It's just not feasible to get million kilometers of validation. It's also about million kilometers of meaningful validation. So it's not just about creating different test cases. But then, you need these test cases to be impactful.
And that's where you need to take the help of the virtual worlds. So if you can bring the testing to the virtual world, you can actually streamline and frontload a lot of the validation process. We will talk about how you can create impactful virtual worlds. The algorithms you create in a particular environment shouldn't be agnostic to that particular environment. You should be able to transport them and use them on other environments.
For example, middleware, like AUTOSAR, ROS, and DDS is really coming up. And you might want to develop an algorithm in one place and actually use them somewhere else. And similarly, let's say you have a C or C++ algorithm, you need to be able to bring it into the simulation environment and actually simulate and understand how the C++ code is working. So it's really important to interoperate with different software.
And what MathWorks really offers is this development platform that helps you integrate between the virtual worlds, between the algorithms and algorithms from different environments. So we can integrate and test all of this together. And that's what today's talk is going to be focused on. Let's take the help of a cruise control EURO NCAP scenario.
So here, the way this EURO NCAP document is evaluated is the fact that one point is given if the vehicle completely avoids crashing into a vehicle and 0.5 if, let's say, the speed of impact is less than five kilometers per hour. And then, there are no points if it does not meet those criteria. And then, you have a different set of criteria for this EURO NCAP scenario. And we will break this down.
And while we are going down into this, it's important to remember the coordinate system. This is a general coordinate system that's used, where the vehicle moving in this direction is the roll. The yaw is on the vehicle turning left and right. And the pitch is obviously the front and back motion of the vehicle.
So here are some common notations in the EURO NCAP document, which is first, AEB, which is autonomous emergency braking, FCW, the forward collision warning. GVT is the global vehicle target, which is the other vehicles other than the ego vehicle. The VUT, commonly which we call as the ego vehicle, is the vehicle under test. And the time to collision is how long the vehicle will take to collide to another vehicle. And then, there's some abbreviations which I don't remember, car-to-car crossing straight crossing paths, which is the test case that you're really trying to solve.
So in order to create a particular environment, RoadRunner comes in. RoadRunner is a tool that helps you create environments from scratch. It's built keeping usability in mind. And it enables engineers to create roads from scratch. So you don't have to be a 3D modeling expert to create RoadRunner roads. It's really easy for an engineer to create the roads. And most parts of the RoadRunner environment is automated.
So for example, here, if you create a road and then create a junction, RoadRunner identifies the most logical junction. However, you can go about modifying most parts of these roads here. We're trying to add a few lanes and then create a 1/2 lane between. And you can play around with the lane markings and change the lane markings on the road as well. So it doesn't have to be logical roads. You can create potholes, and speed breakers, and patchy roads, and all sorts of roads.
You can add the different lane markings or even get rid of the lane markings if you don't need them. Quite often, you see that lane markings aren't made clearly. And they're almost washed off. So you can go down to the level of changing the lane markings and the visibility of the lane markings as well.
And it's important for you to create a good set of virtual scenarios that help you cover different cases. You can play around with elevation. And again, keeping in mind, the usability is really easy to use. After a bit of work, it's possible to get to very complicated scenes and environments like this. And RoadRunner also has a very strong Asset Library with many assets to make the environment look realistic.
And these are all things which one engineer can do over, let's say, a few hours. You can go down to modeling the traffic signals and identifying how some part of the traffic flow happens during different phases of the signal.
So that's RoadRunner and the RoadRunner Asset Library. You can take the help of satellite images, point clouds, and aerial images to create these RoadRunner environments. Additionally, you can also integrate map services. So for example, here, HD live maps and TomTom maps, you can directly import those roads into RoadRunner.
And if you have a particular map service provider that you integrate well with or you like the data from a particular map service provider, RoadRunner can-- you have open APIs to build connectors to different map service providers and build your own roads from those maps. And finally, the roads that you create in RoadRunner is meant to be exported to other simulators. So you can export this either in the OpenDRIVE format, which is the common road format from ASAM.
You can export in FBX format, which is the 3D format. And you can directly export it to multiple simulators, so for example, CARLA, or the Unreal Engine, or VIRES VTD, or IPG CarMaker. So these are different simulators that we can export to. And let's say there's a particular simulator a want to export to. It's Still possible to build a custom interface for that particular simulator. So RoadRunner helps engineers create photorealistic roads and then export them to their target simulator.
The particular test track for this EURO NCAP scenario that we're talking about is a junction where the roads cross. And the lane width specifically has to be between 3.5 meters and two lanes add up to seven meters. And the corner radius needs to be eight meters. So how do you really go about creating this particular EURO NCAP road?
First, you create the road style. The default road in RoadRunner has a footpath. So you get rid of the different roads. The markings was a dashed marking. So you drag and drop the marking. And then, the sides had the solid line marking. So drag and drop the solid line marking. And then, you save this one-road style as the EURO NCAP road style. And this is the road style we're going to reuse over and over again. And then, you create the junction in Road Runner to create the plus, which is the plus junction.
And now I go down to the corner and change the corner radius to eight meters. And then, add the different markings on the sides too because, in the scenario, you had the side markings marked. And get rid of the middle markings. And after you get rid of that, you have the RoadRunner scene for this particular scenario. And this is sped up at four times. So I promise you, I didn't take more than four minutes in this particular scenario.
After you create the-- sorry, after you create the scenario, we move on-- after you create the static part of the scenario, you move on to the dynamic part of the scenario, which is the aspect of the vehicles on top of the road. So Naga briefly talked about the state logic editor. And we believe this is a rich state logic editor that gives users the complete capability of creating complex scenarios, again, keeping usability in mind.
So let's take the example over here, where we're adding a new state for this particular red ego vehicle. So what a state basically means is it tells the ego vehicle or the vehicle which does this connect to and what it should be doing at that particular time. And it's connected between conditions, and then if conditions, and then another state.
So you can actually tell it, when you come next to a particular point, accelerate to another velocity, or slow down, or change lane. So what we have happening over here, the vehicle slows down in front of a speed breaker and, if another vehicle comes into his lane, switch to another lane. So the state logic editor helps you create impactful and complex scenario without too much effort.
There are prebuilt scenarios that you can directly use out of Roadrunner and then reuse this across your different scenarios. For example, cut in and brake and maintaining space gap. And all of this is actually built straight out of the state logic editor. So it's actually really easy for you to create these complex scenarios.
So the RoadRunner Scenario can improve from OpenSCENARIO and export to OpenSCENARIO and integrate with other actor behaviors. So you can actually have your particular actor connected to a RoadRunner actor. And you can also automate the workflows of Roadrunner Scenario. Let's say you don't want to use the UI. You can use an API to do that.
Now, on top of the scene we created for the EURO NCAP scenario, we're going to create the crash. So in order to create the crash, so RoadRunner was built keeping OpenSCENARIO in mind. So it's really easy to create-- sorry, RoadRunner is built keeping EURO NCAP and OpenSCENARIO in mind. So it's really easy to create these scenarios.
First, we add a vehicle. We drag and drop it onto the road. It's important to look at the path the vehicle has to take in the EURO NCAP test. So it has to go in a clothoidal arc. A clothoidal arc is basically a natural turn-- a natural way in which a vehicle takes a right or left turn on a junction. So it's divided into three different parts. The first part has a certain radius of curvature. The second one has a different radius of curvature. And the third one usually has the same radius of curvature as the first one.
So it's pretty complicated to trace out this path. But RoadRunner makes the job really easy. All you need to do is select the two points you want to create the clothoid arc between. And then, there is a property that helps you-- I'm not sure you can see that. But there is a property where you can change the clothoid arc parameters directly.
And after you've created the clothoid arc, you add the other vehicle on the other side. And RoadRunner automatically creates the crash for you. So here's the EURO NCAP scenario, where the crash happens. The goal now would be to connect an algorithm to avoid this particular crash.
So with the Automated Driving Toolbox, we have tons of shipping examples that you can use out-of-the-box as your reference algorithm to test your other controllers and other behaviors. So these shipping examples are connected with RoadRunner and RoadRunner Scenario for the scenario editing, the vehicle dynamics blockset for the creation of the complex vehicle dynamics, the different toolboxes for the algorithm development, the LiDAR toolbox, the Computer Vision Toolbox, sensor fusion and tracking, MPC toolbox, and the Navigation Toolbox. And for testing, which Rishu will be talking about, the Simulink test, Simulink requirements, and real-time.
And here is the final-- another EURO NCAP test. Here's another EURO NAP test, where the algorithm is what is stopping the vehicle from actually crashing into the pedestrian. So when this test was created in RoadRunner Scenario, the vehicle is crashing into the pedestrian. But then when the algorithm is connected, it does not crash into the pedestrian. So with that, I give the stage to Rishu.
Good evening, everyone. And thanks, Munish for the nice presentation. Munish until now talked about creating different types of algorithms that are required for automated driving. He gave a nice introduction around perception, path planning, navigation, control, sensor fusion, and so on. He also introduced RoadRunner, RoadRunner Scenario, how easy it is to author scenarios or create scenes in RoadRunner and RoadRunner Scenario.
And he also mentions the fact that industry is moving towards scenario-based testing. So that requires us to create lots and lots of scenarios. And just creating scenarios based on specifications may not just cut it. So next, I'm going to talk about the same thing, auto industry is moving towards scenario-based testing.
And on that, first, we start with something called as a driving requirement. We look at the driving requirement. We look at what kind of features we are trying to implement in our vehicle. Is it l1? Is it l2? l3, what-- ACC, AEB, and so on? Based on the driving requirements, we will create the scenes or scenarios with the help of Scenario Editor. Scenario Editor, Munish talked about, again, RoadRunner Scenario to author your scenarios. And there, you can have suit of scenarios. But that's not enough.
The next important thing that I'm going to touch upon or talk about today is something called a Scenario Builder. Scenario Builder is a couple of releases back, a support package that was introduced in Automated Driving Toolbox. And the whole purpose of Scenario Builder is to help you create scenarios from the recorded vehicle data. I'll go in a lot of detail to talk about what Scenario Builder is.
The next important thing is what you are getting from these two places is the scenarios. That could be a single scenario that you are trying to use. The scenarios that you are creating from recorded data, it could be the scenarios that you have identified. If you have driven the vehicle for, let's say, 10 kilometers, from that 10 kilometers, you don't want the 10-kilometer data to be recreated as a scenario. You want individual patches, individual time steps, for which you want to recreate the scenario. But then, again, those will be individual scenarios that we are talking about.
The next important thing here is something called as a Scenario Variant Generator. Now, what we call things here, like when we are talking about scenario creation using Scenario Editor or Scenario Builder, we are talking about creating one scenario or few scenarios. But when we are talking about Scenario Variant Generator, let me take an example.
Let's say I want to test out my vehicle, wherein, my ego vehicle is moving at five meter per second and my lead vehicle is moving at three meter per second. Now this is one scenario. And at some point in time, depending upon what is the distance between my ego and the lead vehicle, the collision will happen. This is one scenario.
But another scenario could be, now my ego is moving at 4.5 meters per second. And the lead vehicle is still moving at three meter per second. Now, this is entirely a different scenario. And if we do not have the capabilities to create these variants on top of the seed scenario, this means that we will have to put down our efforts to create-- recreate our scenario from scratch. So the purpose of Scenario Variant Generator is you get a seed scenario. And you spin off hundreds of variants out of it automatically.
Now, we create scenarios from multiple different places, either from the recorded data or from the specifications or requirements. We create a lot of variants out of it. What is the end goal? The end goal is testing out the algorithms. These algorithms could be, as Munish mentioned about, these algorithms could be perception, path planning navigation, controls, sensor fusion, and so on.
Now, once all these scenarios are created, we want to bring all of this into something called as a Test Manager, which allows me to bring in the test bench, as well as all these different scenarios and do the rigorous testing of my feature or algorithm with hundreds and thousands of scenarios in lieu. And definitely, while we are testing out these scenarios, we wanted to have metric. And that metric has to be very relevant.
If I'm testing out my controller, my metric should be focusing on the parameters that controller should work on. If I'm testing out my perception algorithm or sensor fusion algorithm, then my-- for example, if I'm testing out my sensor fusion algorithm, my metrics should be LOSPA, GOSPA, OSPA^2 or per square convert-- comparing my output of the algorithm with the ground truth data.
So the metrics needs to be also selected based on the feature or the algorithm that we are trying to test out. And all these things should be running in sync. While we are getting scenarios, the Test Manager should be able to access scenarios and the vehicle under test or the test bench. Now let's go ahead and look at the entire workflow.
Coming to that Scenario Editor, for Scenario Editor, we have tool named as RoadRunner, RoadRunner Scenario. I'm not going to go into detail. We have had a lot of discussions around the capabilities of RoadRunner Scenario. And on the bottom, you see this is RoadRunner Scenario code simulating with CARLA. We have also seen in the sessions today before this how RoadRunner Scenario can co-simulate with any simulator. We talked about CarMaker. But the idea here is if you have a simulator, RoadRunner Scenario, we can make RoadRunner Scenario work with your simulator while the information is exchanged between the two simulators.
Now let's come to Scenario Builder. Now Scenario Builder, as I mentioned, is nothing but a support package that allows you to create scenarios from recorded data. Now let's go ahead and look at what it may look like. This may look like something, this-- you have a vehicle, which you are driving on road, with the sensors mounted on the vehicle. These sensors could be LiDAR, camera, IMU, LiDAR, different kind of sensor you may have mounted on the vehicle.
You have taken the vehicle on road. And you collect that data. Once that data collection has happened, you bring back that data back inside a lab and you recreate this virtual environment from the real world data itself. So basically, you are trying to create a digital twin of the real world itself. Now, to establish this workflow from this to this or from this sensor data to this, there are a lot of things that go in between. And all these individual blocks have their own associated challenges and different workflows. And this entire-- all these challenges are addressed in something called as Scenario Builder.
Now let's go ahead and look at the workflow in more detail. Now, first thing is we start with the sensor data. Sensor data could be the sensor that you have. It could be just camera. It could be camera LiDAR. It could be camera LiDAR radar. It could be GPS IMU and so on. GPS IMU will be very important if you want to localize your scenario that you are creating.
So now, first thing is you have a sensor data. And the next thing is the ego localization. Now, what is ego localization? If we look at this particular video, this is the raw data that we are getting from the GPS. And this is the fused data. Now, when we are looking at the GPS data, the GPS data in general have a lot of noise in it. That noise could be due to that-- there are different types of GPS that it could be using. It could be DGPS. It could be RTK GPS It could be INS plus GPS.
Depending upon what kind of GPS you're using, what kind of screening you are doing, there could be lot of different artifacts introduced. So here, you can see that this ego is-- the GPS data that we are getting is faulty. And the ego is moving in a haywire direction. So in order to correct this, we have fused the ego data with the GPS data with the help of the IMU data in order to localize the vehicle and get the right trajectory. That is the first thing.
The other thing that may happen is also something called as offset. So offset may happen, let's say, if you are using a DGPS. And the base station that you have is very far from your-- GPS, where you are using. In those cases, you may see an offset in your GPS data, whatever you are recording. So in those cases, you will have to identify those offset. And once identified, we will have to correct that offset in each individual timestamps.
So this is the first problem that comes in very often when we are working with the localization problem. That is, when we are working on a flat terrain. Now, another problem gets introduced if we are talking about the elevated roads or, let's say, flyovers because, when we are talking about flyovers, information goes on toss entirely. We can't rely on the altitude information coming from the GPS.
And if we run Slam on top of it, Slam will be good. You will get the stitched point cloud. But the speed stitched point cloud will be drifting towards the z-axis. So then, again, you need sensor fusion information or the GPS information, along with the IMU information, to correct that odometry data or to correct that trajectory. So first thing is ego localization. I talked about three different challenges. But once we start to get working on it, there could be a lot of different challenges. And this support package allows us to address many of those challenges out-of-the-box.
Now, the next important thing is-- yeah, now the next important thing is road reconstruction. Now, if we think from the perspective, from what all is important in our scenario? Then depending on the use case that I'm working on, I may only need a road, lane, a go vehicle, and a target vehicle. In few of the cases, let's say I'm working on an AEB, in that case, I do not need many-- all-- I do not need the information on the vehicle, which is running in a different lane.
I do not need the information on the trees. I do not need information probably around buildings and all. What I just need is my road information, the lane information that I'm running into, and my lead vehicle information. That's all I need. So we need to be cautious about what all information I need to recreate in the scenario.
So the next important thing is the road reconstruction. Now for road reconstruction, also, there could be a lot of different things that we could do. One is if we are getting camera data. There are a lot of pretrained deep learning detectors that we are supporting that will help you extract the lane boundaries out-of-the-box from the camera data.
If you do not have a camera data, let's say if you have a LiDAR, point cloud data, then also there are a lot of detectors that work on the LiDAR point cloud data and directly give you lane information. So irrespective of what data you are collecting, whether it is a camera data, LiDAR data, or your directory getting the lane information from the map, you can pull all this information inside the RoadRunner and start to stitch your road. This is the first component while you are trying to create your scenario.
Like I said, you can extract the lane boundaries from the camera or the LiDAR data. You can also extract the information around the junctions or road curvature with the help of the LiDAR point cloud data, as well as the camera data.
Once you have identified that information, we can put that information back onto RoadRunner, which starts to build my scenario incrementally. Now the first thing that you see is we have a sensor data. From the sensor data, we have extracted the lane information, which we are printing it back onto the roads that we have discussed in RoadRunner.
Now, the scene is not only roads and lanes. Scene also constitutes as something called as roadside objects. And probably, when I'm testing my AEB, the information on the roadside object is not important. But let's say I'm testing out my perception stack. Now when I'm testing out my perception stack, it is important for me to also know-- also check on the reflections or the shadow that is coming from the trees or any roadside objects. So in those use cases, I need to recreate the roadside objects as well as the obstructions.
Now, in order to recreate these roadside objects, we can either use-- again, there are different workflows to do that. We can use LiDAR. We can use camera. Now, when we are using LiDAR point cloud data in order to recreate the roadside objects, again, we have a lot of detectors. There is Randall in it. There is PVR CNN. There is complex YOLOv4. There are a lot of pretrained models which are already available, which will give us the object information, whether you are working on the organized point cloud data or you are working on the unorganized point cloud data.
Now once you have extracted this information-- and here, you can see we are extracting the lane information. We are extracting the buildings information. We are extracting the tree information, which is pretty accurate. These detectors are in general tuned to detect data from a lot of LiDAR sensor models. They are trained on varied LiDAR sensor models. But what we have seen often is if you are trying to create data from your recordings, we may need to adapt these detectors.
So you start with certain detector. You label certain amount of data with the help of the labeler apps, which allows you to automate the labeling process also. So you label the data. You bring the data back inside MATLAB. And then, there are pipelines to retrain the detector to make it more accurate for your data. So you may start with something that is prebuilt and available. But the whole idea is that you should be able to adapt this toolchain for your workflow.
Now, initially, we only had the road and the lane. But now you see with this pretrained model and the LiDAR point cloud, we are also able to detect trees, buildings pretty accurately and place them from the Asset Library in RoadRunner on the RoadRunner scene itself. Again, coming back. Here, recreating these assets in the virtual world requires us to detect these assets. Some of the assets that can be pretty accurately identified or delineated is poles, trees, buildings, and so on.
There could be other assets that you may want to have in the scene. In those cases, you can also run different detectors. Or you can have your own detector train. Or at the same time, you can use the LiDAR labeler apps to label the point cloud data. And once you have done that, you can populate all that information inside the scenario. And you have your scenario, or rather, a static scene.
Now, until now, what we have talked about was just creating the scene. We have created road. We have created lanes. We have created roadside objects. But now the next important thing is the trajectories of the actor, which is ego vehicle and non-ego vehicle. Now for that, what we require is we should have an object list.
Now, the object list can be provided by the sensor directly. If you are working on a camera or if you are working on a radar sensor, then there is a good chance that you will get the object list directly from the sensor vendor itself. But in many cases, you may not want to use that object list. Or you may want to create your own object list.
So whether you want to use the object list, which is provided by the sensor vendor, you can use that. Or if you are working on the raw sensor data, whether it is a camera LiDAR or radar, we do have pre-established workflow that will help you get the object list. When I say object list, you're not only doing the detections. You're also associating tracks to those detections.
Difference between detections and tracks could be for one extended object in the scene, you could have multiple detections. But for one object in a scene, you will have only a unique track. So what we need is the track list. So this is how our track or our objects list may look like. You have detected all the vehicles. You have detected the dimensions of the vehicles and everything.
Now you know the static positions of those vehicles. And once you start to populate that data or once you start to process that data frame-by-frame, you will get the tracklist created for individual actors in the scene. Now, the ego vehicle information is coming from the GPS plus IMU, that you will have to work around on some of the problems of post-localization.
That will give you the ego trajectory. And all the other actor trajectory can be fetched or can be extracted with the help of the tracklist. Once you have the tracklist ready, you can go ahead and you can place all these different actors inside the scene. And you will have a full blown scenario ready for testing your ADAS stack.
Now, this is a complicated workflow. And what I talked about was the challenges that are associated in individual parts of the workflow. There are a lot of pre-trained models. There are a lot of pre-built examples, which are already available. Now, these, all the examples that you see on the screen right now, are the examples coming in from the Scenario Builder support package itself.
So irrespective of what sensors you are working on, what combination of sensor you are working on, there definitely has to be an example which you can get started with in order to create your scenarios from recorded data. And we would be happy to work with you while you are addressing some of these challenges because individual setup of data collection is different. And the challenges that may come across could be very different as well.
Now, the other very important key aspect, while we are trying to create scenarios from recorded data, which I haven't touched about up until now, is when you are collecting these sensor data while driving the vehicle on road and you have extensive suite of sensors, one of the things that becomes challenging is you have a very nice sensor suit. But at the same time, the problem that it brings is the size of the collected data.
So one hour of the collected data could be one TB, which is a very huge amount of data to process. But do you want to process all that data? Or do you need to process that data? Sometimes, the answer is yes. Sometimes, the answer is no. Now, here is something that we are also parallelly working on is how to extract key scenario events from the full vehicle run.
So you may need-- you may not need to process the entire data. You may need to process only subset of the data, which could be, let's say, GPS IMU plus camera or only GPS IMU data. And we will give you the exact timestamps at which those events happened, for example, over acceleration, over changes in the steering wheel, certain changes in the steering wheel, or low speed, very low speed.
So our road bumps, all these events can be extracted out-of-the-box. So this becomes very important because this can bring down your one TB data to few GBs data of the relevant scenarios that you are working on. And you need not be accessing the entire data to see what scenarios are important to you or what events are important to you.
That was around Scenario Builder support package. The other thing important is the Scenario Variant Generator. Now you have created a seed scenario. It could be whether by the scenario editor, which is RoadRunner Scenario, with the help of the requirements. Or it could be by Scenario Builder, where you have the vehicle log data. And then, you are creating the scenario from the vehicle logs.
Now, Scenario Variant Generator can take the scenarios created from the Scenario Editor or from the Scenario Builder. And it can work on top of it to create variants. Now, all these six figures that you see here, these are the pre-built examples, which are already available inside the tool right now. And what these examples enable you to do is these enable you to generate scenario variants for different scenarios, like ACC, AEB, lane keep assist, and so on.
So you bring a seed scenario tell what properties of the scenario you want to modify, and we will automatically vary those properties and spin off hundreds of scenarios for you. Let's go a little bit in detail in this as well. Now, Munish, very-- he flashed this particular graphic. But let's spend a few seconds on this.
So this is a EURO NCAP variation table for different scenarios. So CPFA, CPNA, CPNC, these are different scenarios. Now, if you look at this particular table, what this wants is vehicle under test should be tested from 10 to 60 kilometer per hour. Target speed should also vary. Impact location should also vary. Lighting condition and many other things needs to be varied.
So basically, you have this one scene created. But then from this one scene, there are hundreds of variations that you may want to create. Now the specifications from EURO NCAP is to vary between 10 to 60. But whether you want to vary it 10, 11, 12, 13, 14 or you want to vary 10, 15, 16, 20 and so on. So from this particular table, we can create hundreds of scenarios for this just one seed scenario.
And how do we do it? There are two ways of creating scenarios in MATLAB. One is the RoadRunner scenario, which we have talked quite a lot today, which is a 3D photorealistic world. And another is a driving scenario, DS, world, which is a cuboid world. You can author your scenarios in both the worlds.
If you are just authoring your scenarios which are trajectory based, then DS is the workflow that you can go ahead with. And if you are authoring more intelligent scenarios which are event-driven, like Munish mentioned, if all else, all these logics, you want to encounter or have in your scenarios, then you go with the RoadRunner scenario approach.
Irrespective of where you are creating your scenarios, whether it is driving scenario or RoadRunner Scenario, you can provide those scenarios as a seed scenario. In the Variant Generator, it will extract the scenario descriptor out of it. From that seed scenario descriptor, it will automatically spin off different variations. And those variation properties could be dimensions of the actor or the collision impact location of the collision happening. Or it could be velocity of the vehicle under test or global target vehicle. Anything can be changed.
Once you have created these variations, you can again spit out the created variants into either driving scenario format, or RoadRunner Scenario format, or in OpenSCENARIO format. So if you are working on a simulator that support OS 2.0, OS 1.0, then we can also export these scenarios, which can be taken to the simulators as well.
How do we enable all of this? By simple APIs or function calls, getScenario, getScenarioDescriptor, getCollisionData, varyActorProperties, and so on. So now, what is the intent of these individual functions is get ScenarioDescriptor gives you the property of the scenario that you need to modify. It could be trajectory. It could be actor, which could be GVT or VUT.
And then, other APIs like varyActor Properties that allow you to vary speed, waypoints, like trajectory, dimensions, and so on. You can modify these properties for a single target. Or you can modify these properties for a multiple target. So if you want your target also to change in the multiple iterations of the scenario, that is also possible.
Collision, like in the EURO NCAP scenario, which Munish created, we were-- the collision was happening at a 50%. The vehicle was colliding to a GVT at a 50% impact location. But you may want it-- the location to be 20%, 40%, 60%. And these are the variations which are actually required by the homologation authorities.
Now, again, there are a lot of scenarios or the examples. In the first slide, what we see was the RoadRunner Scenario version of it. However, if you are working on the DS version of it, also, these examples are pre-built and made available, which you can use to establish or complete your workflow.
This is another interesting thing that got introduced, I think, last release or a couple of releases back. And here, what we are doing is you may create a scenario in a seed scenario. But if you want to take this scenario that you have created and translocate it to a different scene altogether, then also it can be done. And all the logistics, like identifying what lanes, what junctions, what intersections, the scenario can be translocated to will be automatically taken care by the example itself.
So you can create a seed scenario. And that scenario can be translocated to any scene. So the identification of-- so it could be a large scene. The identification of which junctions fit for the translocation of this scenario is something that will be done inherently. And only those scenarios will be spawned off.
Now, a lot on scenarios. We talked about RR scenario. We talked about Scenario Builder support package. We talked about Scenario Variant Generator. But again, at the end of the day, our purpose is validation and testing. And when we are talking about validation and testing, these are the systems under test. It could be our algorithms. It could be ECUs. And within these systems, either it could be perception, pat-- perception, sensor fusion, planning, or controls. Or it could be all of it.
So again, coming back, this all scenarios should be integrated with something called as a Test Management Tool, which should not only run these scenarios simultaneously, it should also give us the reports and also evaluate the metrics that-- whichever we want to provide. And also, at the same time, we need a data viewer so we can visualize, what is happening at individual time steps in my simulation run?
Now let's go ahead and look at one example that we have created for this test automation framework. So you have scenario, which is most important. You have Simulink Test Manager. It could be EURO NCAP scenario. It could be scenario created from recorded data. It could be scenario authored by you and then variants being created on top of it. On the right, it's a very interesting way of representing the EURO NCAP score rating, which we will also talk about.
Now, what are the things which are most important to set up our test automation framework? The most important things to set up the test automation framework is I should have a test bench, which is a integrated test bench with all my modules that are under test or that are required to establish the closed loop simulation workflow.
Now, the next important thing is scenarios. I may want to test on one scenario, 10 scenario, 100 scenarios. I may want to leverage Scenario Builder. I may want to leverage Scenario Variant and so on. But on top of this, what is also important is Test Manager. The results, we should be able to visualize the results in a representative format. And that should help me bring closer to my actual requirement of meeting the certification, let's say. And the last is report generation.
Now, let's go ahead and look at a quick example as to how we have done it for one of the use cases of EURO NCAP scenario. So this is a test bench model for autonomous emergency braking. It has all the different blocks, starting from sensors environment, sensor fusion, AEB logic, the controller logic for breaking a non-linear MPC controller for acceleration brake, vehicle dynamics model, as well as the metric block.
This is our test bench, which contains all the different functionalities. And we will launch something called as a Test Manager with our scenario. So now, here you can see we have integrated the test bench. And this is the same script and the same functions like get ScenarioDescriptor, varyActorProperties, and so on, which we have incorporated within the test management setup itself so that it will take this one CP NC scenario from EURO NCAP, it will create these many variations automatically, and it will start the testing.
So with that script that we have created within the Test Manager, it has actually spinned off 36 different scenarios. And now it is doing the testing of your controller on all those 36 scenarios. Now here we have one seed scenario. And the iterative object have created 36 scenarios. It could be 10 seed scenarios, so 360 different scenarios.
Now, once all of this is done, you can also create the report out of it, which can be for all test, fail test, and so on. The generated report can be PDF, doc, or anything. And once the report is created, you can navigate through that report to understand what went right, what went wrong. So all the 36 scenarios that you have run, you can see here, some places, we are changing the collision point. Some places, we are changing the vehicle under test velocity and so on. These are the metrics, pass/fail results. This is the other information on the setup. And these are all the simulation results at individual time stamps.
So this is-- I want to pause here. I want to talk about this for a moment. So when we are talking about EURO NCAP testing, what becomes important is, let's say I'm testing out AEB. The specifications specify that my vehicle should reduce the impact. So let's say my vehicle was moving at 20 kilometers per hour when it detected an event of AEB.
Now, what EURO NCAP says is not that your vehicle should stop. If it stops, it's awesome. But what it can also do is, if it reduces the speed from 20 to, let's say, two kilometer per hour, it will significantly reduce the impact of the collision. So that means you are not-- it's not a binary thing. You get rating one, two, three, four, five.
So if your vehicle is able to reduce the speed from, let's say, 20 to two, you get five star rating. If you are able to reduce the velocity from 20 to, let's say, 10, it's not a five star, but you still get rated. So it depends on how impactful the collision was. And that kind of report can be automatically generated while you are running this through test automation framework.
So with that, we talked about the RoadRunner, RoadRunner Scenario. We talked about Scenario Builder, Variant Generator. We also talked about the Test Automation Framework, where we have taken our seed scenario, created variants out of it, and then did the rigorous testing of the sensor fusion logic, and also evaluated that with the metrics. And the data visualization and report generation was also something that we discussed about. Although, not in detail. But these are some of the things which are most important. And we would be happy to connect back and talk, share more details on each of these.
So that's about it. Thank you all very much for joining today. And these are some of the call to actions. I guess we have had good interactions today at the demo booth. But let us know if you are facing challenges or if you are working on AD/ADAS workflows. We would be happy to collaborate with you. We would be happy to brainstorm and understand your problem statement Thank you so much.
[APPLAUSE]
Featured Product
Automated Driving Toolbox


Select a Web Site
Choose a web site to get translated content where available and see local events and offers. Based on your location, we recommend that you select: United States.
You can also select a web site from the following list
Americas
- América Latina (Español)
- Canada (English)
- United States (English)
Europe
- Belgium (English)
- Denmark (English)
- Deutschland (Deutsch)
- España (Español)
- Finland (English)
- France (Français)
- Ireland (English)
- Italia (Italiano)
- Luxembourg (English)
- Netherlands (English)
- Norway (English)
- Österreich (Deutsch)
- Portugal (English)
- Sweden (English)
- Switzerland
- United Kingdom (English)