Vehicle Local Motion Planner for Small Obstacles Mitigation
By leveraging Navigation Toolbox™ and Stateflow® with MATLAB®, you can design a search-based local motion planner to generate a minimal safe trajectory over an obstacle. This planner can handle a variety of cases including:
- Generating a new trajectory to drive over a small obstacle
- Generating a trajectory around the obstacle if it is too large
- Including reverse motion if the obstacle is detected very close to the vehicle
Published: 2 May 2023
Hello, and welcome to this tutorial on the Small Obstacle Mitigation Module. This video is part of the Autonomous Construction Vehicle series. My name is Seifeldin Dabbour And I am an EDG engineer, working in autonomous vehicle algorithms.
Suppose you have a large vehicle traveling around a complex environment, consisting of obstacles that are planned and unplanned. The small obstacle mitigation module aims to make this task more efficient. We can illustrate this by taking into account our environment here, model as a cost map. Here, we've designed our buildings as dark red zones with a light pink region around them to represent a danger zone where the vehicle should avoid traveling because it can hit the walls.
Here's our vehicle on top of the green start position, trying to get to the red end position. To generate this trajectory, let's plug-in this whole map into our global planner. Here, our hybrid A-star planner has generated a trajectory minimizing the total path length and taking into account our vehicle dynamics, such as its minimum turning radius.
Great. But what if we had a small unexpected obstacle such as the one we see here represented by this red dot? Well, let's try to take this entire environment now and plug it back into our global planner.
Uh-oh, what we can see is while we did get a new trajectory that goes around the obstacle, it did take a much larger path than it needs to. We can do better by generating a local, real time planner that allows us to generate a trajectory that goes not just around an obstacle but also from the start position, travel over the obstacle, and continue on towards the goal position.
To do this, let's take a look at our first approach, the walls approach. In this method, we create virtual constraints, walls, around our obstacle such that we can guide our vehicle directly over the obstacle instead of only around it. In this method, we need to be sure to construct the walls very particularly so as not to construct the goalposts.
Unfortunately, however, because of the nature of search-based planners, they are bound to create a dense network between these two walls, lengthening the search time dramatically. Let's take a look at our second approach, the waypoints approach. In this method, we set up special helper waypoints so that our vehicle is guided not just around the obstacle but over it as well.
Here, we can see that the obstacle is surrounded by these two waypoints here representative stars. In this example, the vehicle will start at the start position, continue on towards the left waypoint, travel over the obstacle to the right waypoint, and then continue on towards the goal. Great.
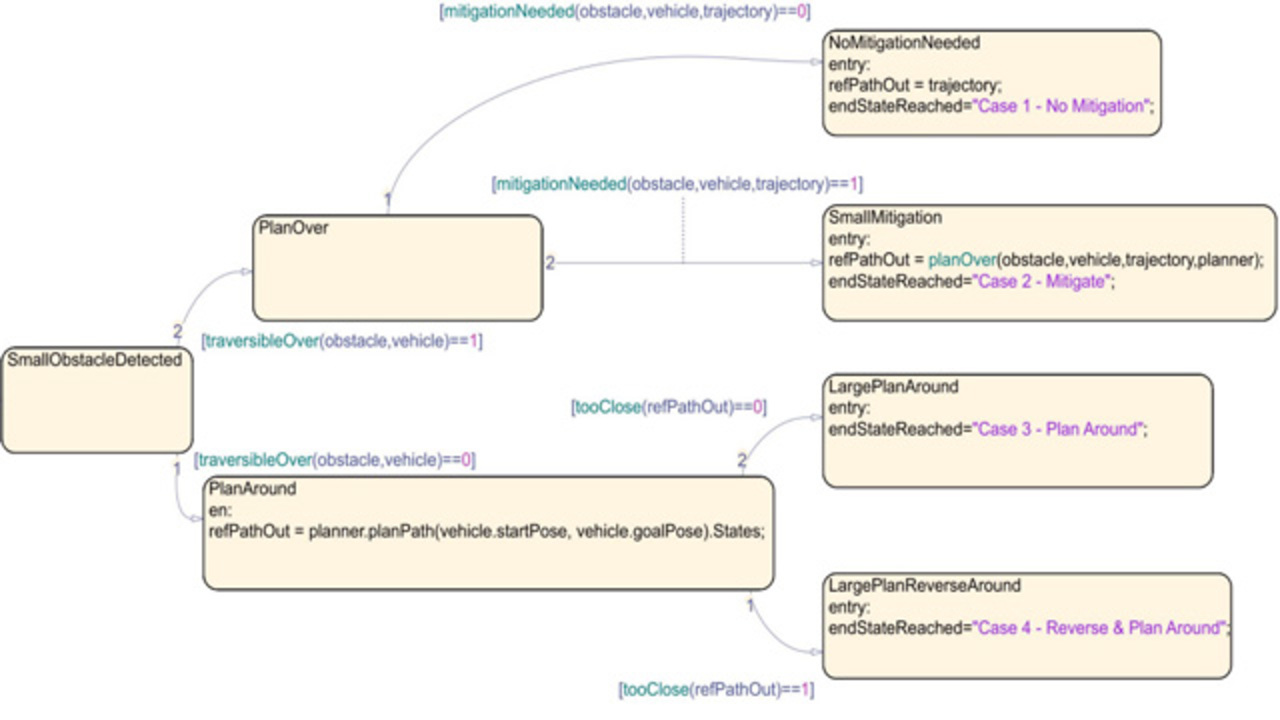
We need to make sure that during this demonstration, our waypoints are constructed correctly such that we'll be able to minimize our total path length and set up a robust algorithm that can handle a variety of cases. Let's talk about the different cases we need to make sure to account for now. First, we have a small obstacle in which we can travel over it. But it's also close to the center line of our vehicle.
So our original trajectory doesn't actually need to change at all. This is great. That means that we don't need to generate a new path for the vehicle. But what if we remove this obstacle and place it instead here where it would collide with the vehicle.
In this case, the obstacle is still small enough to pass over. But we do in fact need to generate a new trajectory. Furthermore, what if the obstacle isn't here but rather over here where a tight corner exists. We need to make sure that in this special case our algorithm is robust enough to handle this case.
What if we remove the small obstacle and instead we had a large obstacle that's far away from the vehicle? We need to make sure that our vehicle can detect the size of the obstacle and generate trajectory not just over it but also around it. Furthermore, what if the obstacle isn't over here towards the end of the trajectory but rather right in front of the vehicle at the beginning. We detect it way too late in the game. Here, we need to make sure that we reverse first so that we can take into account our vehicle dynamics.
Let's talk about our solution here first discussing our assumptions. First, we need to make sure that we have a detection distance large enough such that we don't collide with the obstacle before we detect them. Additionally, we need to have an onboard sensor that's able to accurately measure the surrounding environment and the obstacle so we can get the obstacle location and size accurately. We'll get this data and turn it into a set of inputs for our algorithm, including a map of the environment, the original trajectory from the global planar, the vehicle parameters, including minimum turning radius and width, obstacle characteristics, including location and size.
Our algorithm should just generate our updated traversal trajectory safe enough that we can travel around any of the four cases. To design our solution, we can create a state machine, using the state flow MathWorks product. This will allow us to recursively go down the few cases that we have and generate a path that is perfect to handle the case that we're in. This machine will take in our inputs and generate the trajectory accurately.
Let's start by using a demonstration. Here, we've defined the vehicle parameters, including width, length, minimum turning radius, start position, and goal position. To begin, let's illustrate our simplest case where we don't need to make any changes at all. We have defined our obstacle location, our obstacle size, loaded in the precreated map from our environment, including the obstacle here. And I plug it into a custom initialization function where we pass all of our inputs into our state flowchart and run our machine.
Let's see the output now. Here, we can see that we've detected an obstacle and that it's small so we can plan over it. Here we can see the generated trajectory is exactly the same as the original. In this trajectory, we can travel safely over the obstacle. And this is illustrated here. Fantastic.
However, what if the obstacle isn't in such a simple place and instead placed where it would collide with the vehicle? Let's try this now. To change this, let's remove the first obstacle and place it again at a different location in this line here. Let's keep it the same.
Let's modify and load the map again and use the same custom initialization function. Let's run this and get our output here. Fantastic. We can see that we have generated a new trajectory that smoothly connects our helper waypoints, allowing the vehicle to travel from the start position over the obstacle smoothly and continue on towards the goal position. Great. But let's try our harder case.
Let's move the obstacle here and put it towards the tight corner. Here, all we'll do is, again, just change the location of the obstacle, keep the size the same, load the map, and run our initialization function. Awesome.
We can see that here we've generated trajectory that still goes over the obstacle. But we do overshoot the goal pose a little bit. Not to worry. We can reverse and make sure that we get to the correct position.
This is great. What if the obstacle isn't small, though? Let's address our case three and four where our obstacles are quite large. Suppose a large crate was left in this area here. Let's see how we can do that in our code.
To prepare our algorithm for this, we've changed the single location from our previous example into a range of locations representing the entire size of the obstacle and have given it a distinct size here. We've updated the map and loaded it using our same custom initialize function. Here, once we initialize, we can see that we detect the obstacle. And we can generate a trajectory going all the way around it.
This is great. We can see that even for large obstacles, our local real time planner can still handle them. Remember, however, this was for a large obstacle placed towards the end of our trajectory. What if we address case four in which the obstacle is in fact closer to the beginning?
Let's take a look at that now. Here we've just changed the location of the obstacle, kept the size the same, loaded in our map, and use our custom initialized function again. In this case, we see that we detected an obstacle, have seen that it's large. And I've decided to plan around it.
Here, we could see that the vehicle decided to reverse first before planning its way all the way towards the goal post. This is great. I encourage you to play around with the map and the other parameters in this tutorial code to make this code yours.
We hope you get as much functionality out of this module as we have. Thank you so much. And we'll see you next time.
Related Products
Learn More

Featured Product
Navigation Toolbox
Up Next:


Related Videos:


Select a Web Site
Choose a web site to get translated content where available and see local events and offers. Based on your location, we recommend that you select: United States.
You can also select a web site from the following list
Americas
- América Latina (Español)
- Canada (English)
- United States (English)
Europe
- Belgium (English)
- Denmark (English)
- Deutschland (Deutsch)
- España (Español)
- Finland (English)
- France (Français)
- Ireland (English)
- Italia (Italiano)
- Luxembourg (English)
- Netherlands (English)
- Norway (English)
- Österreich (Deutsch)
- Portugal (English)
- Sweden (English)
- Switzerland
- United Kingdom (English)