Image Acquisition Explorer
Description
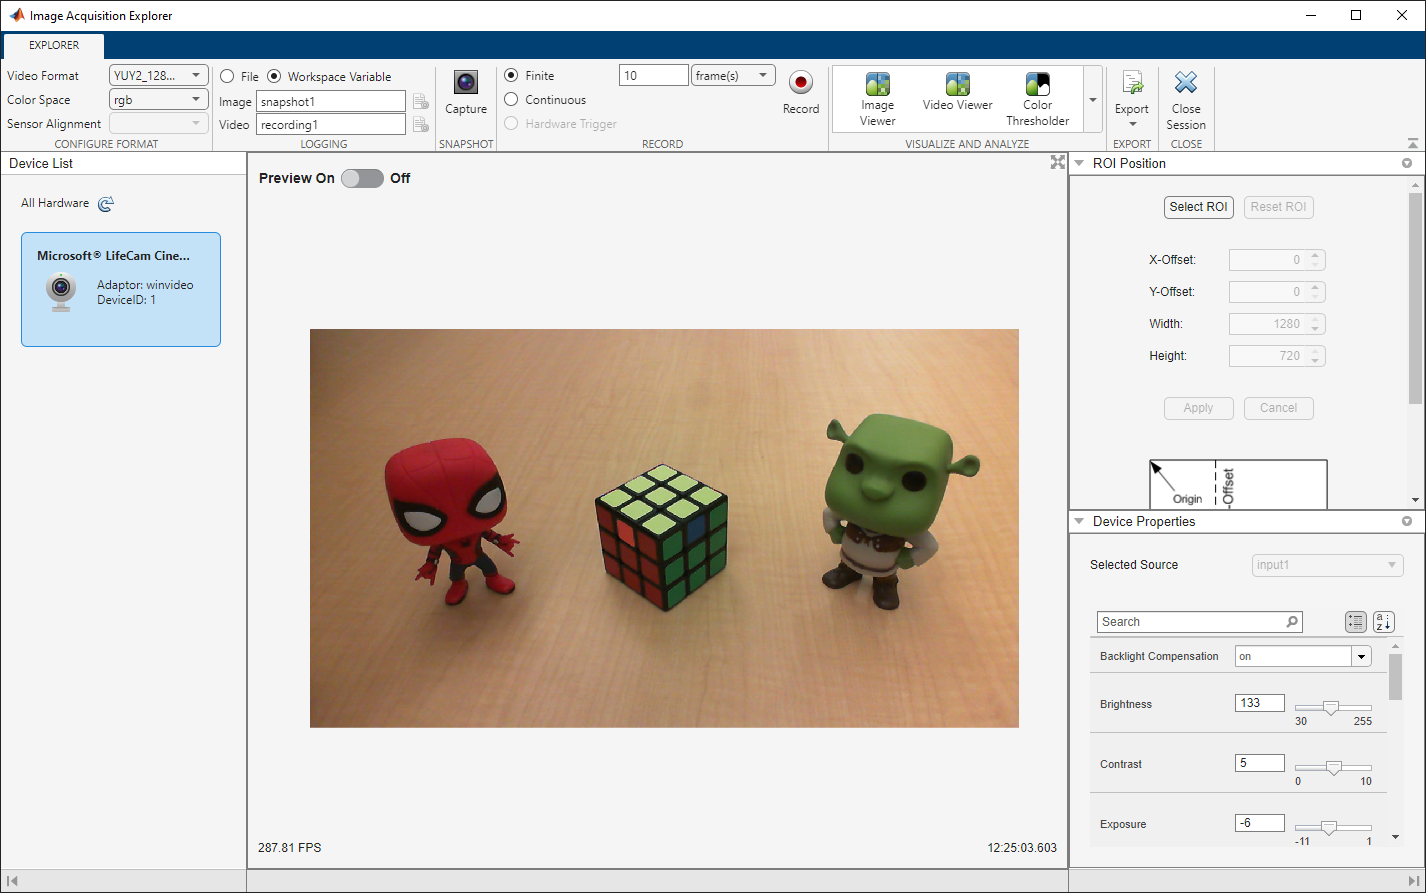
The Image Acquisition Explorer app provides a user interface to acquire images and video from cameras and frame grabbers.
Using this app, you can:
Preview live video data from your image acquisition hardware.
Configure device-specific properties and acquisition settings such as video format, region of interest, and hardware trigger.
Save image snapshot and video recording data to a file or to the MATLAB® workspace.
Visualize and analyze saved data by launching Image Processing Toolbox™ apps.
Generate a MATLAB live script for app interactions that uses the
videoinputinterface.
Open the Image Acquisition Explorer App
MATLAB Toolstrip: On the Apps tab, under Image Processing and Computer Vision, click the app icon.
MATLAB command prompt: Enter
imageAcquisitionExplorer.
Examples
- Get Started with Image Acquisition Explorer
- Select Your Device and Configure Format in Image Acquisition Explorer
- Set Acquisition Parameters in Image Acquisition Explorer
- Log Data in Image Acquisition Explorer
- Preview and Acquire Data in Image Acquisition Explorer
- Export Code from Image Acquisition Explorer
Parameters
Configure Format
Click this button  to select a device configuration file, also known as a
camera file or digitizer configuration format file, from your computer. Some image
acquisition devices use these files to store device configuration information. The app
uses this file to determine the video format and other configuration information.
to select a device configuration file, also known as a
camera file or digitizer configuration format file, from your computer. Some image
acquisition devices use these files to store device configuration information. The app
uses this file to determine the video format and other configuration information.
When you open the app, the rest of the app toolstrip is disabled until you select a camera file. You can change the camera file at any time.
Note
The camera file is provided by the device manufacturer. See your device documentation for more information.
Dependencies
This button is available only for devices that support camera files.
This parameter is read-only.
This is the name of the camera file that you selected using the Select Camera File button. You can view the full file path by hovering your cursor over the file name.
Dependencies
This parameter is available only for devices that support camera files.
Select the video format used by the device to capture images and video. The list of values for this parameter depends on the video formats supported by your device. The format selected when you open the app is the device's default format.
Dependencies
This parameter is available only for devices that support video format.
Select the color space that the app uses when it returns image data. The list of values for this parameter depends on the Video Format selected.
If you select grayscale, you can set the
Colormap and Color Limits parameters.
Color Limit — Toggle this switch to Manual to set the minimum and maximum values on the specified colormap. The default values are 0 and 255. All values in the preview that are less than or equal to the minimum value map to the lowest value of the colormap. All values in the preview that are greater than or equal to the maximum value map to the highest value of the colormap.
Colormap — Colormap applied to the preview. For a full list of options, see
map.
If you select bayer, you can set the Sensor
Alignment parameter.
Select the 2-by-2 pixel Bayer color filter array pattern of the Bayer color filter array. The specified pattern is used to convert the Bayer pattern image to RGB. There are four possible sensor alignments. For more information about which one to select, refer to your device documentation.
| Value | Description |
|---|---|
gbrg | The 2-by-2 sensor alignment is green blue red green |
grbg | The 2-by-2 sensor alignment is green red blue green |
bggr | The 2-by-2 sensor alignment is blue green green red |
rggb | The 2-by-2 sensor alignment is red green green blue |
Dependencies
This parameter is enabled only if your device supports Bayer sensor alignment and
Color Space is set to bayer.
Logging
Edit the name of the image file or name of the workspace variable to save snapshot image data as.
If you select the File option, this parameter defines the image file name. You can click the configuration icon next to this parameter for additional settings, including the file location to save to and file format to save as.
If you select the Workspace Variable option, this parameter defines the workspace variable name.
When you click the Capture button, the snapshot image data is saved as the specified file or workspace variable.
For more information, see Log Data in Image Acquisition Explorer.
Edit the name of the video file or name of the workspace variable to save recorded data as.
If you select the File option, this parameter defines the video file name. You can click the configuration icon next to this parameter for additional settings, including the file location to save to and file format to save as.
If you select the Workspace Variable option, this parameter defines the workspace variable name.
When you click the Record button, the recorded data is saved as the specified file or workspace variable.
For more information, see Log Data in Image Acquisition Explorer.
Snapshot
Click this button  to immediately capture a single image frame and save it
as an image file or as a workspace variable, depending on your selection of
File or Workspace Variable in the
Logging section. For more information, see Capture Image Snapshot.
to immediately capture a single image frame and save it
as an image file or as a workspace variable, depending on your selection of
File or Workspace Variable in the
Logging section. For more information, see Capture Image Snapshot.
Record
Set the recording mode as finite and specify the number of frames or seconds to save when you click the Record button. When you select this option, you have two options for finite recording.
Specify the number of
frame(s)to record. For more information, see Record Finite Number of Frames.Specify the number of
second(s)to record. For more information, see Record for Finite Duration.
Set the recording mode as continuous to start saving frames when you click the Record button. For more information, see Record Continuously.
Set the recording mode as hardware trigger. Hardware triggered acquisition is supported for GigE Vision® and GenICam™ GenTL devices. When you select this option, the app opens a Hardware Trigger tab. You can define the following hardware trigger parameters.
Number of Triggers
Frames per Trigger
Trigger Source
Trigger Condition
If you are using this recording mode, make sure you
also enable hardware triggered acquisition in the Device Properties
by setting Trigger Mode to On and
specifying other Trigger Selector parameters for your setup.
For more information, see Set Up Hardware Triggering and Record with Hardware Trigger.
Dependencies
This parameter is enabled only if your device supports hardware triggered acquisition.
Click this button ![]() to acquire multiple frames and save them as a video
file or as a workspace variable, depending on your selection of
File or Workspace Variable in the
Logging section. This button becomes a
Stop button after you click it. End recording at any time and
save the recorded data by clicking Stop.
to acquire multiple frames and save them as a video
file or as a workspace variable, depending on your selection of
File or Workspace Variable in the
Logging section. This button becomes a
Stop button after you click it. End recording at any time and
save the recorded data by clicking Stop.
While you are recording, the app toolstrip and all property tabs are disabled. You can not change the value of any parameters during recording.
For more information, see Record Video.
Visualize and Analyze
Click this button ![]() to launch the Image Viewer app and send it
the most recent image data captured in this app session.
to launch the Image Viewer app and send it
the most recent image data captured in this app session.
You must have Image Processing Toolbox installed to use the Image Viewer app.
Click this button ![]() to launch the Video Viewer app and send it
the most recent video data recorded in this app session.
to launch the Video Viewer app and send it
the most recent video data recorded in this app session.
You must have Image Processing Toolbox installed to use the Video Viewer app.
Click this button  to launch the Color Thresholder app and send
it the most recent image data captured in this app session.
to launch the Color Thresholder app and send
it the most recent image data captured in this app session.
You must have Image Processing Toolbox installed to use the Color Thresholder app.
Click this button  to launch the Image Segmenter app and send
it the most recent image data captured in this app session.
to launch the Image Segmenter app and send
it the most recent image data captured in this app session.
You must have Image Processing Toolbox installed to use the Image Segmenter app.
Export
Click this button ![]() to select an option to generate a MATLAB live script for capturing a snapshot or recording a video and open it in
the Live Editor. The live script contains code for the current device configuration, as
specified in the Configure Format section, and code for saving data
as a file or workspace variable, as specified in the Logging
section.
to select an option to generate a MATLAB live script for capturing a snapshot or recording a video and open it in
the Live Editor. The live script contains code for the current device configuration, as
specified in the Configure Format section, and code for saving data
as a file or workspace variable, as specified in the Logging
section.
For more information, see Export Code from Image Acquisition Explorer.
Version History
Introduced in R2022a