Design, Test, Document, and Deploy Simulink Blockset Using Blockset Designer
This example demonstrates how to use Blockset Designer for end-to-end management of designing, authoring, testing, documenting, and deploying a Simulink® blockset. This example showcases how you can use Blockset Designer as a unified platform to perform all the necessary blockset authoring functions.
Consider a scenario where you want to:
Develop a blockset of related Simulink blocks: For instance, create a blockset of S-functions that includes Linear, Brush Fiala, and Pacejka tire models.
Organize the blocks into sublibraries: For example, group the tire model blocks into linear and non-linear categories.
Ensure all authored blocks meet specific standards: For instance, maintain consistent sign convention across all tire models to ensure uniformity.
Provide documentation for your authored blocks: For example, provide users of the tire blockset with equations of the tire models.
Distribute the completed blockset with downstream users: For example, share the tire blockset with users who will integrate these blocks into their system-level models requiring tire dynamics.
This example illustrates how you can employ Blockset Designer to meet all these stated requirements. This example provides a step-by-step guide to help you build the tire model blockset from the ground up along with a completed example blockset VehicleTireModel for your reference.
Create a Blockset Project, Open Blockset Designer, and Organize Your Blockset
Open a blockset designer project. To do so, on the HOME tab of the MATLAB® toolstrip, select Simulink. Doing so opens the Simulink start page. Select Blockset Designer in the Simulink section.

Doing so opens the Create Project dialog box. Specify the name and folder for your project. By default, a new folder is automatically created in the directory username\MATLAB\Projects\<foldername>. Click OK to create a new blockset project folder. This opens the project in MATLAB along with the blank Blockset Designer window.
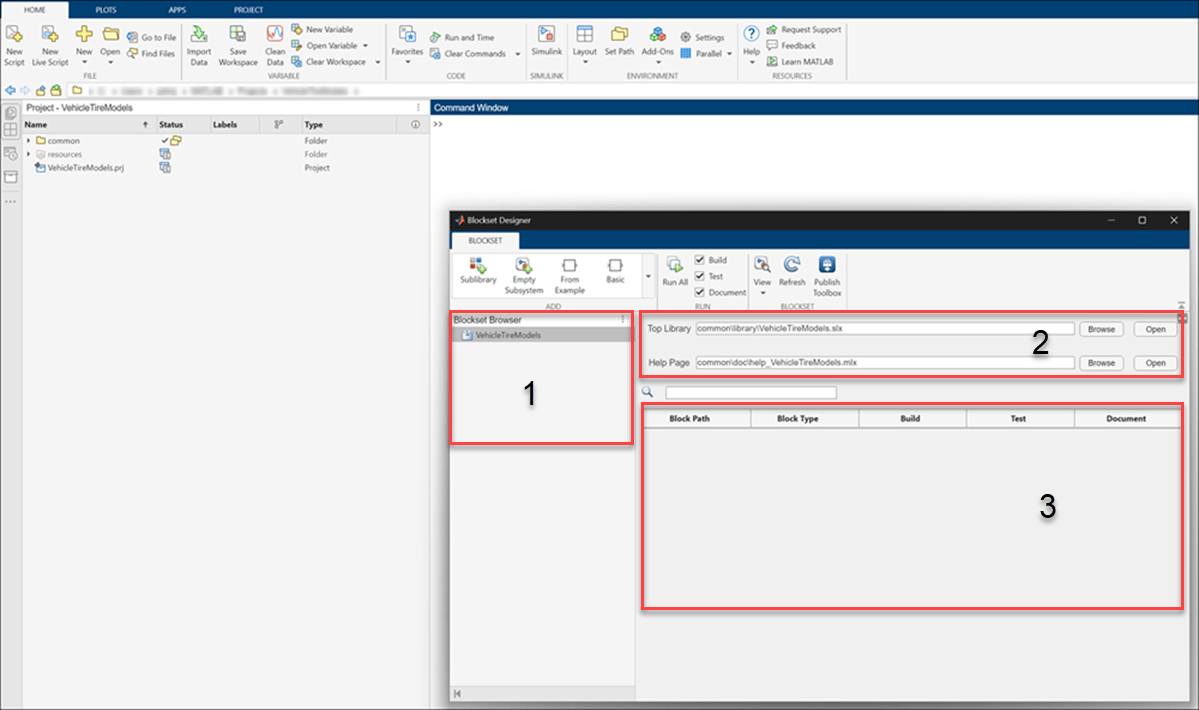
The Blockset Designer window contains a toolstrip and these three sections:
Blockset Browser: This section displays the organization of the blocks and sublibraries as a tree.
Top Library: This section displays the path to the top library model and its help page.
Status Table: This section shows the block paths and type along with the build, test, and documentation status of all the blocks in this blockset.
For more information about the layout of Blockset Designer, see Create a New Blockset Project.
Add general information regarding the blockset in the Help Page help_<foldername>.mlx specified in the Top Library information.
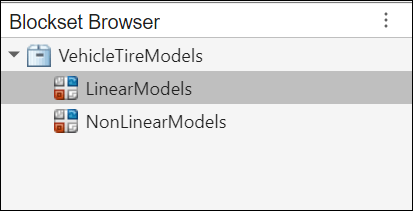
Create two sublibraries within the top library to segregate the tire models into linear and non-linear models. To do so, from the ADD section of the Blockset Designer toolstrip, select Sublibrary. Name the first sublibrary as LinearModels and the second as NonLinearModels. Observe that the Blockset Browser is updated with the new sublibraries.
To add S-Function blocks to the respective sublibraries, right-click the sublibrary in the browser and select Add block > C-MEX S-Function > Basic. Specify the name of the S-Function block.
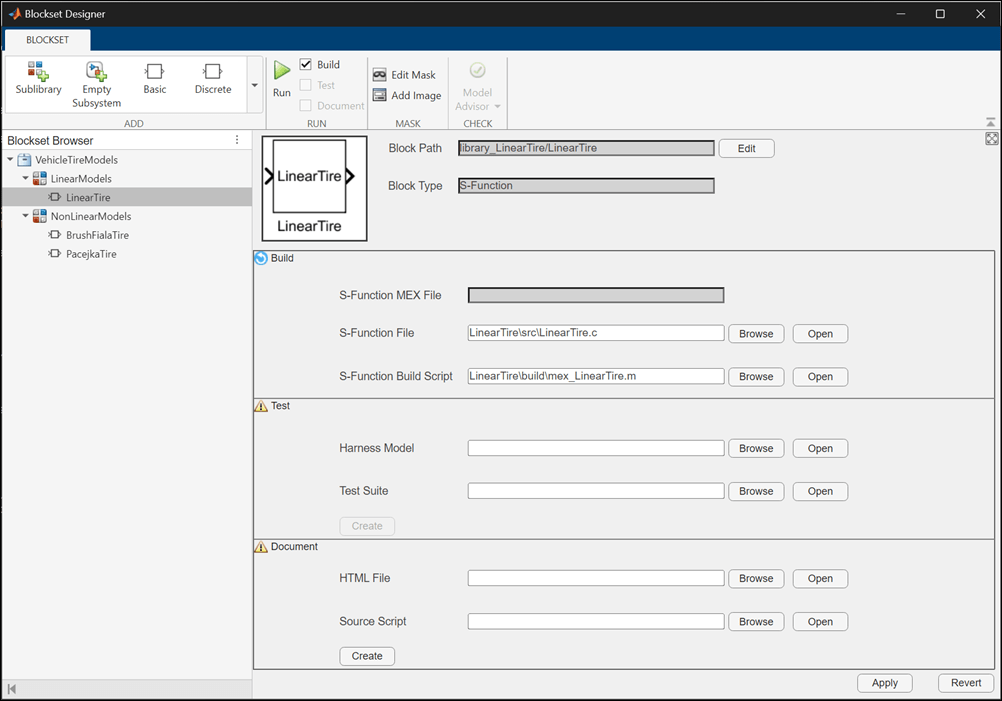
Add LinearTire to the LinearModels sublibrary. Add BrushFialaTire and PacejkaTire to the NonLinearModels sublibrary. Blockset Designer adds empty source, test, and documentation files for each of the blocks. Observe that the browser window is updated with the blocks in the tree. The status table lists the new blocks and the status of the block artifacts.

For more information on creating and organizing your blockset and project, see Create a Blockset Project.
Author Block Algorithms
With the blockset structure finalized, you can proceed to author the algorithm of your blocks using C++ MEX S-Functions.
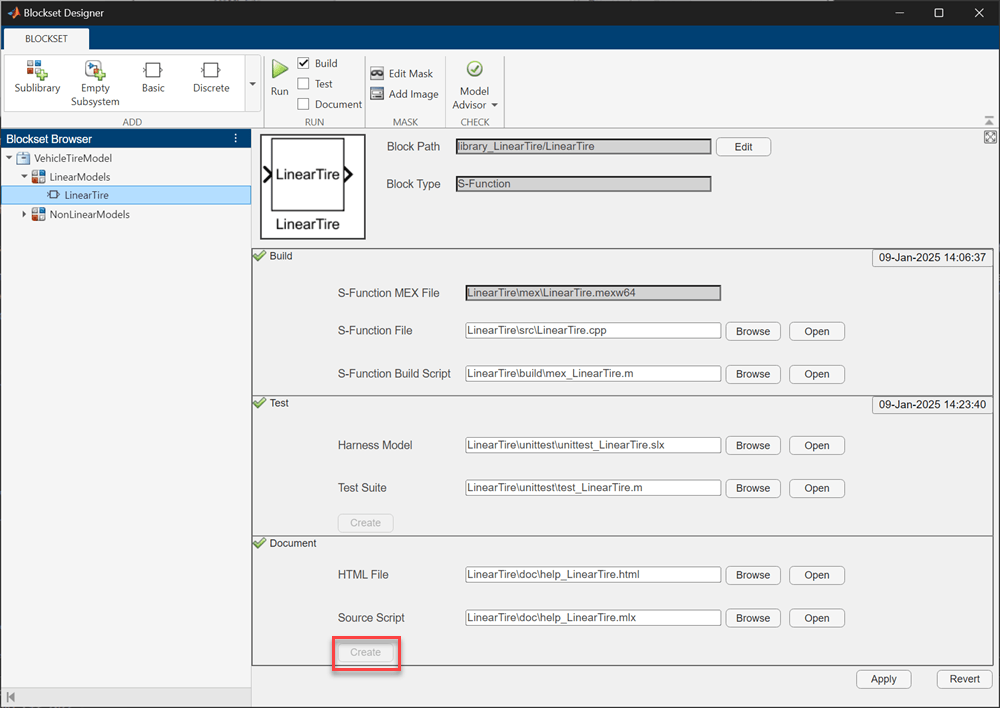
Open the block page for the Linear Tire model by selecting LinearTire from the Blockset Browser tree. Observe that Blockset Designer populates the fields S-Function File and S-Function Build Script with the generated artifacts. The file paths for these are relative to the project root.
Click Open button corresponding to the S-Function File field to open the S-Function source file. Specify the algorithm for the tire model within the source file for this S-Function.
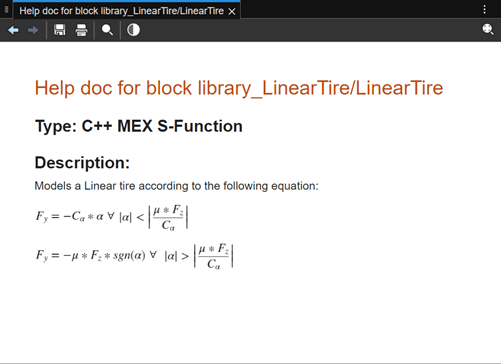
In this example, the Linear Tire model is described by the following equation:
where is the lateral force generated by the tire, is the lateral cornering stiffness of the tire, is the lateral slip of the tire, is the friction coefficient between the tire and the ground, and is the vertical load on the tire. You can implement this in the S-Function framework.
Declare the class for the tire model in a header file LinearTire\src\LinearTireClass.h.
#ifndef LINEARTIRE_H
#define LINEARTIRE_H

#include <cmath>

class linearTire
{
    private:
    double c_alpha;
    double mu;
    double Fz;

    public:
    linearTire(double c_a, double fricCoeff, double fz);

    double calculateLateralForce(double lateralSlip);

    double calculateSaturation();
};

#endif
Specify the implementation of the class methods in the file LinearTire\src\LinearTireClass.cpp.
#include "LinearTireClass.h"

linearTire::linearTire(double c_a, double fricCoeff, double fz)
{
    c_alpha = c_a;
    mu = fricCoeff;
    Fz = fz;
}

double linearTire::calculateLateralForce(double lateralSlip)
{
    double Fy = -c_alpha * lateralSlip;

    if (std::abs(lateralSlip) > std::abs(calculateSaturation()/c_alpha))
    {
        return (Fy >= 0) ? calculateSaturation() : -calculateSaturation();
    }
    else
    {
        return Fy;
    }
}

double linearTire::calculateSaturation()
{
    double F_sat = mu*Fz;
    return F_sat;
}
Use the mdlStart callback of the S-Function to initialize the class and store it in a pwork vector of the S-Function.
static void mdlStart(SimStruct *S)
  {
      if (ssGetNumSFcnParams(S) != 3)
      {
          ssSetErrorStatus(S, "This block requires exactly 3 parameters: c_alpha, mu, Fz");

          return;
      }

      double c_alpha = mxGetScalar(ssGetSFcnParam(S, 0));  // First parameter (c_alpha)
      double mu = mxGetScalar(ssGetSFcnParam(S, 1));       // Second parameter (mu)
      double Fz = mxGetScalar(ssGetSFcnParam(S, 2));       // Third parameter (Fz)

      std::unique_ptr<linearTire> tirePtr = std::make_unique<linearTire>(c_alpha, mu, Fz);
      ssGetPWork(S)[0] = tirePtr.release();
  }
Use the mdlOutputs callback to define the block algorithm at each timestep.
static void mdlOutputs(SimStruct *S, int_T tid)
{
    real_T *u = (real_T *)ssGetInputPortSignal(S,0);
    real_T *y = (real_T *)ssGetOutputPortSignal(S,0);

    linearTire *myTire = static_cast<linearTire *>(ssGetPWork(S)[0]);
    y[0] = myTire->calculateLateralForce(u[0]);
}
Use the mdlTerminate callback to safely deallocate the memory after simulation.
static void mdlTerminate(SimStruct *S)
{
    linearTire *tirePtr = static_cast<linearTire *>(ssGetPWork(S)[0]);
    delete tirePtr;
    ssGetPWork(S)[0] = nullptr;
}
See LinearTire\src\LinearTire.cpp file inside the example blockset VehicleTireModel for the complete implementation of the S-Function. For more information on authoring block algorithms using C/C++ MEX S-Functions, see Create C/C++ S-Functions.
To include C++ functionality in your S-Function, rename the source file with the CPP extension and add the additional class definition file. You must also open the build script for the block and change the file extension to CPP and add initialization for the block parameters.
mex('-outdir',fullfile(blocksetroot,'LinearTire\mex') ,'-g',fullfile(blocksetroot,'LinearTire\src\LinearTire.cpp'),fullfile(blocksetroot,'LinearTire\src\LinearTireClass.cpp'),['-I' fullfile(blocksetroot,'LinearTire\src')]);
On the Blockset Designer tool strip of the block page, in the Run section, select the Build option and click Run to build the S-Function. Doing so compiles the S-Function, generates the MEX file for your S-Function, and saves it to LinearTire\mex folder of your project. The S-Function MEX File field in the block page is populated with the path to the generated MEX file.

Similarly, specify the block algorithm for the Brush Fiala tire and Pacejka tire.
In this example, the Brush Fiala Tire model is described by the following equation:
where is the lateral force generated by the tire, is the lateral cornering stiffness of the tire, is the lateral slip of the tire, is the friction coefficient between the tire and the ground, and is the vertical load on the tire. See BrushFialaTire\src\BrushFialaTire.cpp and BrushFiala\src\BrushFialaTireClass.cpp files inside the example blockset VehicleTireModel for the complete implementation of the S-Function.
The Pacejka Tire model is described by the following equation:
where is the lateral force generated by the tire, ,, and are the tire coefficients, is the lateral slip of the tire, and is the vertical load on the tire. See PacejkaTire\src\PacejkaTire.cpp and PacejkaTire\src\PacejkaTireClass.cpp files inside the example blockset VehicleTireModel for the complete implementation of the S-Function.
Create Block Tests
Create tests for your blocks to ensure that the block algorithms specifying the tire models follow a uniform sign conventions.
Write test cases to ensue that:
Positive slip produces negative lateral force.
Negative slip produces positive lateral force.
Zero slip produces zero lateral force.
These tests will ensue that all the blocks follow consistent sign convention throughout the block authoring process.
Before generating test artifacts you must first set initial values of the S-Function parameters to ensure that the blocks compile. To specify initial parameter values for the LinearTire, open the library_LinearTire library file located in the \LinearTire\library folder. Unlock the library file, open the block dialog box (CTRL + U), and specify initial parameter values.
To generate required test artifacts for your LinearTire block, on the block page, click Create within the test section. Doing so creates a harness model with the generated block and a test suite within the LinearTire\unittest folder.

Blockset Designer supports the following three testing frameworks:
MATLAB unit tests based on
matlab.unittest.TestCaseclass.MATLAB based Simulink tests based on
sltest.TestCase(Simulink Test) class.Tests authored in Simulink Test Manager.
By default, Blockset Designer creates a MATLAB unit test file when you select the Create button. You can create your desired test suit in the unittest folder of your block and specify the test suit in the Test Suit field.
In this example, the LinearTire block is tested for the three test conditions using a MATLAB unit test, the BrushFialaTire is tested using the MATLAB based Simulink test, and the PacejkaTire is tested using tests authored in Simulink Test manager. All the three tests use a harness model to run the authored tests. By default, the harness model contains a Signal Editor block that you can configure with input scenarios for your authored test cases. For information on using the Signal Editor block to create input scenarios for your test, see Create and Edit Signal Data. Use the test suite to apply the input scenario and check for test conditions. For example, in the example blockset VehicleTireModel, the LinearTire block is tested using the following three test cases within a matlab.unittest.TestCase based test.
methods (Test)
        function testPositiveSlip(testCase)
            set_param([testCase.ModelName '/Harness Inputs'], 'ActiveScenario', 'PositiveSlipTest');
            simOut = sim(testCase.ModelName, 'SimulationMode', 'normal', 'StopTime', '1');

            outputSignal = simOut.yout{end}.Values.Data(end);

            testCase.verifyTrue(outputSignal < 0);
        end

        function testNegativeSlip(testCase)
            set_param([testCase.ModelName '/Harness Inputs'], 'ActiveScenario', 'NegativeSlipTest');
            simOut = sim(testCase.ModelName, 'SimulationMode', 'normal', 'StopTime', '1');

            outputSignal = simOut.yout{end}.Values.Data(end);

            testCase.verifyTrue(outputSignal > 0);
        end

        function testZeroSlip(testCase)
            set_param([testCase.ModelName '/Harness Inputs'], 'ActiveScenario', 'ZeroSlipTest');
            simOut = sim(testCase.ModelName, 'SimulationMode', 'normal', 'StopTime', '1');

            outputSignal = simOut.yout{end}.Values.Data(end);

            testCase.verifyTrue(outputSignal == 0);
        end
    end
See LinearTire\unittest\test_LinearTire.m file inside the example blockset VehicleTireModel for the complete implementation of the test suite.
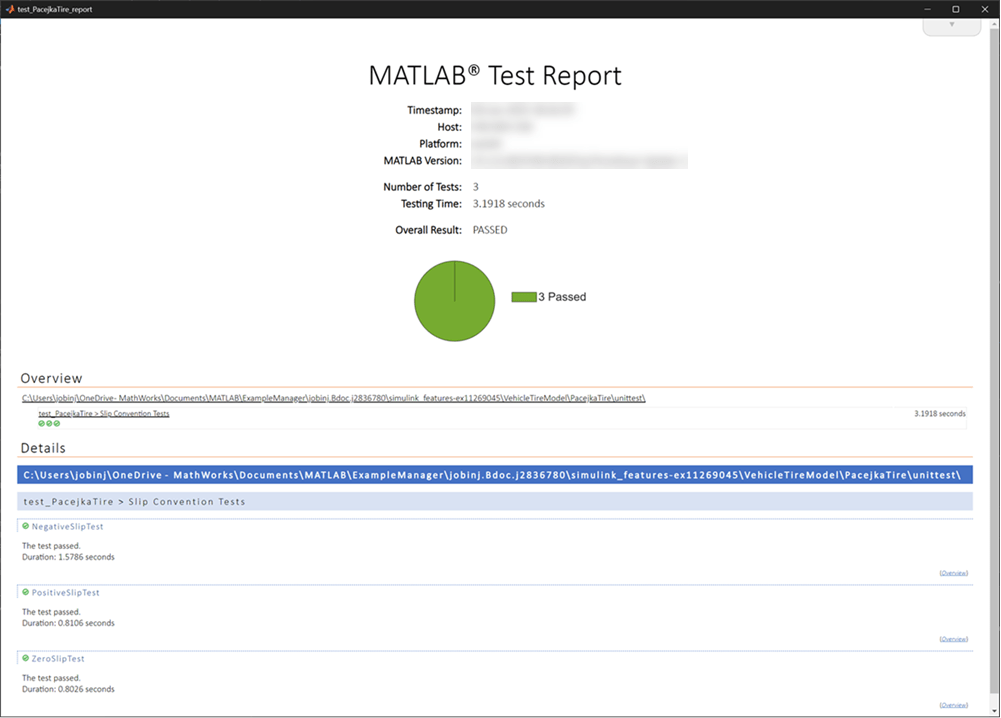
To run a test, open the block page, select the Test option from the Run section, and click the Run button. Doing so opens the specified test suite, runs all the tests within the test suite, and opens the test report.

In the example blockset, test_PacejkaTire.mldatx is specified as the test suite for the Pacejka Tire. This opens the Simulink Test Manager, runs all the specified tests within it, and opens the generated report for the test results.
For more information on creating test artifacts for you block in Blockset Designer, see Add Tests to Blocks.
Document the Blocks
You can add documentation for the authored blocks in Blockset Designer to provide specific block information for the users of the blockset. Adding documentation helps you provide relevant block information to the downstream user of the block. The user can open the documentation from the block Help button.
To generate required documentation artifacts for your LinearTire block, on the block page, click Create within the document section. Doing so creates a documentation source script and an HTML render of the documentation within the LinearTire\doc folder.
Open the documentation source script help_LinearTire.mlx file. Add the desired documentation in the script. For example, you can add the equation of the tire model for the LinearTire block. After you add the documentation to the source script, build the HTML for the documentation. To do so, from the Run section of the toolstrip, select Document option and select Run. To see the HTML from the block, open the library model for the block and on the block dialog box click the Help button. Doing so opens the specified documentation.
Publish the Blockset
After you have completed authoring the blocks, tests, and documentation for your blockset, you can publish the blockset as a toolbox and share it with downstream users. For more information on publishing your blockset, see Publish the Created Blockset.
Open and Simulate Example Blockset
Open the example blockset and build the S-Functions to generate their MEX files.
openProject("VehicleTireModel\VehicleTireModel.prj");
mex('-outdir',fullfile(pwd,'LinearTire\mex') ,'-g',fullfile(pwd,'LinearTire\src\LinearTire.cpp'),fullfile(pwd,'LinearTire\src\LinearTireClass.cpp'),['-I' fullfile(pwd,'LinearTire\src')]);
Building with 'MinGW64 Compiler (C++)'.
MEX completed successfully.
mex('-outdir',fullfile(pwd,'BrushFialaTire\mex') ,'-g',fullfile(pwd,'BrushFialaTire\src\BrushFialaTire.cpp'),fullfile(pwd,'BrushFialaTire\src\BrushFialaTireClass.cpp'),['-I' fullfile(pwd,'BrushFialaTire\src')]);
Building with 'MinGW64 Compiler (C++)'.
MEX completed successfully.
mex('-outdir',fullfile(pwd,'PacejkaTire\mex') ,'-g',fullfile(pwd,'PacejkaTire\src\PacejkaTire.cpp'),fullfile(pwd,'PacejkaTire\src\PacejkaTireClass.cpp'),['-I' fullfile(pwd,'PacejkaTire\src')]);
Building with 'MinGW64 Compiler (C++)'.
MEX completed successfully.
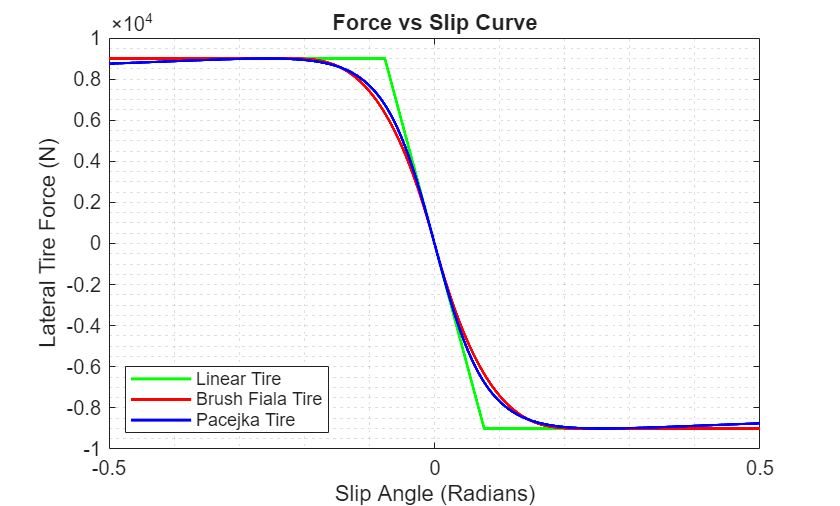
Open the model tireModelSimulation to simulate the generated blocks for a specified range of slip angles.
model = 'tireModelSimulation';
open_system(model);

mu = 0.9;
Fz = 10000;
c_alpha = 118060;

mu_str = num2str(mu);
Fz_str = num2str(Fz);
c_alpha_str = num2str(c_alpha);

param_string_linearTire = strcat(c_alpha_str,',',mu_str,',',Fz_str);
set_param('tireModelSimulation/LinearTire','Parameters',param_string_linearTire);

param_string_brushFialaTire = strcat(c_alpha_str,',',mu_str,',',Fz_str);
set_param('tireModelSimulation/BrushFialaTire','Parameters',param_string_brushFialaTire);

b = 10;
c = 1.3;
d = 9000;

b_str = num2str(b);
c_str = num2str(c);
d_str = num2str(d);
param_string_pacejka = strcat(b_str,',',c_str,',',d_str);

set_param('tireModelSimulation/PacejkaTire','Parameters',param_string_pacejka);

simData = sim(model);

figure(1);
plot(simData.yout{4}.Values.Data,simData.yout{1}.Values.Data,'g','LineWidth',1.5)
hold on
plot(simData.yout{4}.Values.Data,simData.yout{2}.Values.Data,'r','LineWidth',1.5)
hold on
plot(simData.yout{4}.Values.Data,simData.yout{3}.Values.Data,'b','LineWidth',1.5)
grid minor
xlabel('Slip Angle (Radians)')
ylabel('Lateral Tire Force (N)')
title('Force vs Slip Curve')
legend('Linear Tire', 'Brush Fiala Tire', 'Pacejka Tire', 'Location','southwest')