Image Fusion
The toolbox requires only one function for image fusion: wfusimg. You'll find full information
about this function in its reference page. For more details on fusion
methods see the wfusmat function.
In this section, you will learn how to:
Merge images from their decompositions
Restore images from their decompositions
The principle of image fusion using wavelets is to merge the wavelet decompositions of the two original images using fusion methods applied to approximations coefficients and details coefficients (see [MisMOP03] and [Zee98] in References).
The two images must be of the same size and are supposed to
be associated with indexed images on a common colormap (see wextend to resize images).
Two examples are examined: the first one merges two different images leading to a new image and the second restores an image from two fuzzy versions of an original image.
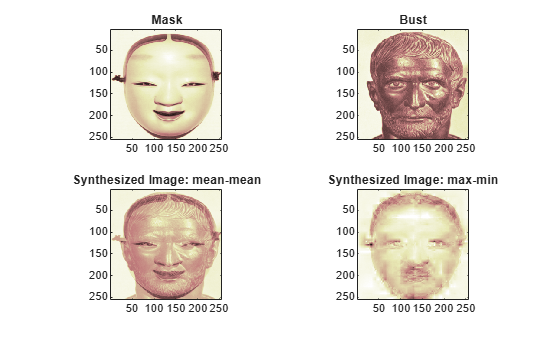
Fuse Two Images
This example shows how to fuse two images to create a new image.
Load the mask and bust images.
load mask
x1 = X;
load bust
x2 = X;
Merge the two images from level 5 wavelet decompositions using the db2 wavelet. Perform the fusion by taking the mean for both approximations and details.
wv = 'db2';
lv = 5;
xfusmean = wfusimg(x1,x2,wv,lv,'mean','mean');
Merge the two images again, but this time perform the fusion by taking the maximum of the approximations and the minimum for the details.
xfusmaxmin = wfusimg(x1,x2,wv,lv,'max','min');
Plot the original and fused images.
subplot(2,2,1)
image(x1)
axis square
title('Mask')
subplot(2,2,2)
image(x2)
axis square
title('Bust')
subplot(2,2,3)
image(xfusmean)
axis square
title('Synthesized Image: mean-mean')
subplot(2,2,4)
image(xfusmaxmin)
axis square
title('Synthesized Image: max-min')
colormap(map)
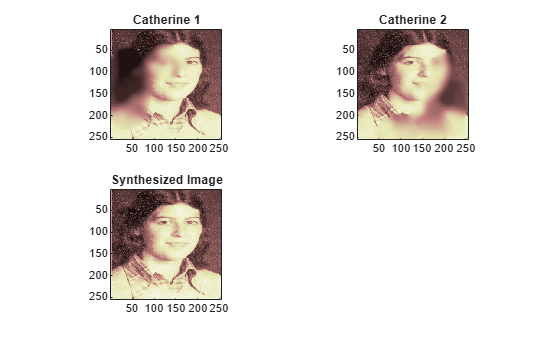
Restore Image From Two Fuzzy Versions
This example shows how to restore an image from two fuzzy versions of an original image.
Load two fuzzy versions of an original image.
load cathe_1
x1 = X;
load cathe_2
x2 = X;
Merge the two images from level 5 wavelet decompositions using the smy4 wavelet. Perform the fusion by taking the maximum of the absolute value of the coefficients for both approximations and details.
wv = 'sym4';
lv = 5;
xfus = wfusimg(x1,x2,wv,lv,'max','max');
Plot the original and fused images.
subplot(2,2,1)
image(x1)
axis square
title('Catherine 1')
subplot(2,2,2)
image(x2)
axis square
title('Catherine 2')
subplot(2,2,3)
image(xfus)
axis square
title('Synthesized Image')
colormap(map)