Send Precomputed Trajectory to KINOVA Gen3 Robot Arm
This example shows you how to connect to the KINOVA Gen3 7-DoF Ultralightweight Robot arm with Simulink® using Robot Operating System (ROS). This includes ROS message Subscribe and Publish blocks to get feedback from the robot and then send command to the robot to follow a precomputed joint trajectory.
Products Required
MATLAB®
Simulink
Robotics System Toolbox™
ROS Toolbox
Hardware Required
KINOVA® Gen3 Robot
Introduction
Robotics System Toolbox Support Package for KINOVA Gen3 Manipulators enables you to control manipulators using MATLAB and Simulink. This support package utilizes ROS packages provided by robot manufacturers to acquire various sensor data, simulate robot models, and control the robot. You can prototype algorithms and perform simulations of these robots using rigid body tree models from Robotics System Toolbox or Simscape™ Multibody™ robot models. This support package also allows you to connect with the robot hardware to test and validate your algorithms.
In this example /my_gen3/joint_states ROS message is used to get current joint configuration of KINOVA Gen3 robot. Then follow joint trajectory custom ROS action is used for sending command to a robot to follow a desired precomputed joint trajectory. For more information on the advantages of the precomputed trajectory and its limitation, see Track Pre-Computed Trajectory of Kinova Gen3 Robot End-Effector Using Inverse Kinematics and KINOVA KORTEX MATLAB API.
Prerequisites
If you are new to Simulink, watch the Simulink Quick Start.
Perform the initial of the support package using Hardware Setup screens and select ROS interface in step 2.
Refer to Connect to the Kinova Gen3 Robot and Initiate Required ROS Nodes to Control the Robot for information on the communication interface between MATLAB and the robot. Execute the steps to initiate required ROS nodes.
Model
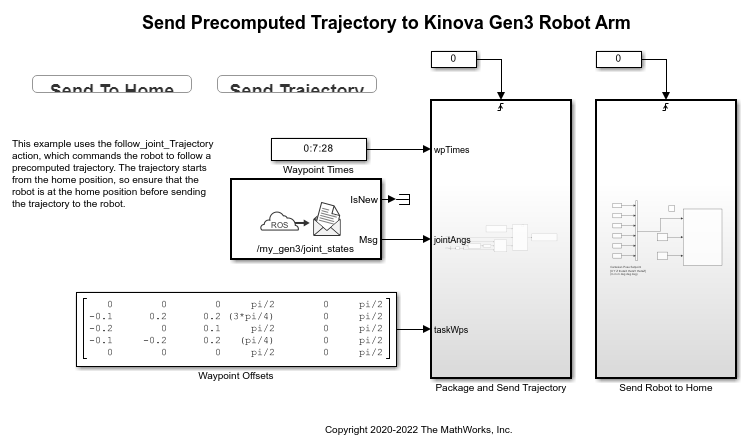
Open the manipdemo_sendTrajectoryROS model.

The model consists of a ROS Subscriber block which is configured for /my_gen3/joint_states ROS topic. As explained in the GitHub page of Kinova Robotics, the first part of the ROS topic, 'my_gen3' might be different based on the robot name set during the roslaunch command. The current joint configuration and Cartesian offset waypoints along with the time to achieve each waypoint is fed to Package and Send Trajectory subsystem. This subsystem calculates joint configuration for each waypoint using Inverse Kinematics block and then calculates a smooth trajectory between waypoints using trapezoidal velocity profile interpolation. This precomputed joint trajectory command is further given to the robot using /my_gen3/gen3_joint_trajectory_controller/follow_joint_trajectory/goal ROS action.
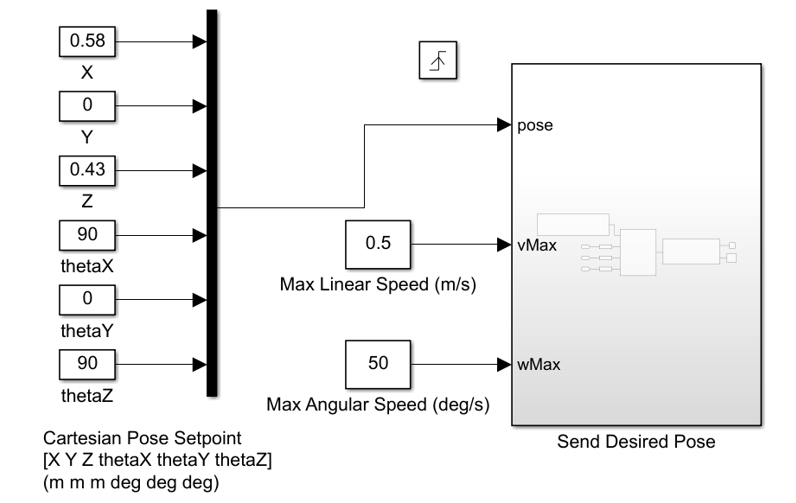
Send Robot to Home

The waypoint offsets are considered from the home position. Hence the model consists of a subsystem and a push button which sends robot to the home position from its current position. The structure of this subsystem is similar to the example Send KINOVA Gen3 Robot Arm to Desired Cartesian Pose.
Package and Send Trajectory

This subsystem consists of three primary blocks related to ROS and auxiliary subsystem to calculate the joint configuration for each waypoint. The Blank ROS message block is configured to create a blank message for control_msgs/FollowJointTrajectoryActionGoal ROS action goal. The MATLAB function block, packageTrajectory calculates interpolated joint angle trajectory and assigns various values to blank message fields. Finally, the publisher block is configured for /my_gen3/gen3_joint_trajectory_controller/follow_joint_trajectory/goal ROS action and for sending commands to robot to follow the precomputed joint angle trajectory.
Waypoint Inverse Kinematics

This subsystem consists of auxiliary algorithm to calculate the joint configuration for each waypoint. Primarily it uses certain frame transformations and Inverse Kinematics block to calculate joint angle configuration for each Cartesian waypoint. For more information on Inverse Kinematics, see Control Cartesian Position of KINOVA Gen3 Robot End-Effector Using Inverse Kinematics Block and KINOVA KORTEX System Object.
Run the Model
Note: Ensure that the E-STOP is close to you to stop the movement of robot, as the robot moves according to the specified waypoints.
After launching required ROS nodes and connecting to the ROS network, click Simulate on the Simulink toolbar and then click Run. The robot will not move when simulation starts. Press the Send To Home button to command the robot to move from its current position to the home position. Wait for the robot to stop moving completely and then press Send Trajectory. This triggers the Package and Send Trajectory subsystem and smooth interpolated trajectory will be calculated based on the desired waypoints. The trajectory calculation process is computationally intensive and will take few minutes to complete. After the trajectory is calculated, it is provided to the robot and the robot starts moving. The precomputed trajectory has to meet certain requirements in order to be accepted by the robot. For more information on the limitation and requirements of precomputed trajectories, see GitHub page of Kinova Robotics. The trajectory followed by the robot with default waypoint offsets is similar to Generate a Trajectory Using a Set of Waypoints for KINOVA Gen3 Robot End-Effector example. For more information, see Generate a Trajectory Using a Set of Waypoints for KINOVA Gen3 Robot End-Effector.