Build CAN Communication Simulink Models
Build the Message Transmit Part of the Model
This section shows how to build the part of the model to transmit CAN messages, using Vehicle Network Toolbox™ blocks with other blocks in the Simulink® library.
Building a model to transmit CAN messages is detailed in the following steps:
For this portion of the example
Use a MathWorks virtual CAN channel to transmit messages.
Use the CAN Configuration block to configure your CAN channel.
Use the Constant (Simulink) block to provide data to the CAN Pack block.
Use the CAN Transmit block to send the data to the virtual CAN channel.
Use this section with Build the Message Receive Part of the Model and Save and Run the Model to build your complete model and run the simulation.
Step 1: Create a New Model
To start Simulink and create a new model, enter the following at the MATLAB® command prompt:
simulink
In the Simulink start page dialog, click Blank Model, and then Create Model. An empty Editor window opens.
In the Editor toolstrip Simulation tab, click Save > Save As to assign a name to your new model.
Step 2: Open the Block Library
In the model Editor toolstrip Simulation tab, click Library Browser.
The Simulink Library Browser opens. Its left pane contains a tree of available block libraries in alphabetical order. Expand the
Vehicle Network Toolboxnode and clickCAN Communication.
Step 3: Drag Vehicle Network Toolbox Blocks into the Model
To place a block into your model, click a block in the library and drag it into the editor. For this example, you need in your model one instance each of the following blocks:
CAN Configuration
CAN Pack
CAN Transmit
Note
The default configuration of each block in your model uses MathWorks Virtual 1 Channel 1. You can configure the blocks in your model to use virtual channels or hardware devices from other vendors.
Note
By default, block names are not shown in the model. To display the block names while working in the model Editor, in the toolstrip Format tab click Auto and clear the Hide Automatic Block Names selection.
Step 4: Drag Other Blocks to Complete the Model
This example uses a Constant (Simulink) block as a source of data. From the Simulink > Commonly Used Blocks library, add a Constant (Simulink) block to your model.
Step 5: Connect the Blocks
Make a connection between the Constant block and the CAN Pack block input. When you move the pointer near the output port of the Constant block, the pointer becomes a crosshair. Click the Constant block output port and, holding the mouse button, drag the pointer to the input port of the CAN Pack block. Then release the button.
In the same way, make a connection between the output port of the CAN Pack block and the input port of the CAN Transmit block.
The CAN Configuration block does not connect to any other block. This block configures its CAN channel for communication.
Step 6: Specify the Block Parameter Values
You set parameters for each block in your model by double-clicking the block.
Configure the CAN Configuration Block. Double-click the CAN Configuration block to open its parameters dialog box. Verify or set the following parameters:
Device to
MathWorks Virtual 1 (Channel 1).Bus speed to
500000.Acknowledge Mode to
Normal.Click OK.
Configure the CAN Pack Block. Double-click the CAN Pack block to open its parameters dialog box. Verify or set the following parameters:
Data is input as to
raw data.Name to the default value
CAN Msg.Identifier type to the default
Standard (11-bit identifier)type.Identifier to
500.Length (bytes) to the default length of
8.Click OK.
Configure the CAN Transmit Block. Double-click the CAN Transmit block to open its parameters dialog box. Verify or set the following parameters:
Device to
MathWorks Virtual 1 (Channel 1).Click OK.
Configure the Constant Block. Double-click the Constant block to open its parameters dialog box.
On the Main tab, set:
Constant value to
[1 2 3 4 5 6 7 8].Sample time to
0.01seconds.
On the Signal Attributes tab, set:
Output data type to
uint8.Click OK.
Your model looks like this figure.

Build the Message Receive Part of the Model
This section shows how to build the part of the model to receive CAN messages, using the Vehicle Network Toolbox blocks with other blocks in the Simulink library. This example illustrates how to receive data via a CAN network, in the following steps:
For this portion of the example
Use a MathWorks virtual CAN channel to receive messages.
Use a CAN Configuration block to configure your virtual CAN channel.
Use a CAN Receive block to receive the message.
Use a Function-Call Subsystem (Simulink) block that contains the CAN Unpack block. This function takes the data from the CAN Receive block and uses the parameters of the CAN Unpack block to unpack your message data.
Use a Scope (Simulink) block to display the received data.
Step 7: Drag Vehicle Network Toolbox Blocks into the Model
For this part of the example, start with one instance each of the following blocks from the Vehicle Network Toolbox CAN Communication block library:
CAN Configuration
CAN Receive
Tip
Configure separate CAN channels for the CAN Receive and CAN Transmit blocks. Each channel needs its own CAN Configuration block.
Step 8: Drag Other Blocks to Complete the Model
Use the Function-Call Subsystem block from the Simulink Ports & Subsystems block library to build your CAN Message pack subsystem.
Drag the Function-Call Subsystem block into the model.
Double-click the Function-Call Subsystem block to open the subsystem editor.
Double-click the In1 port label to rename it to CAN Msg.
Double-click the Out1 port label to rename it to Data.
Drag and drop the CAN Unpack block from the Vehicle Network Toolbox block library into this subsystem. If placed between the input and output lines, they will automatically connect.
The inside of your Function-Call Subsystem block should now look like this figure.
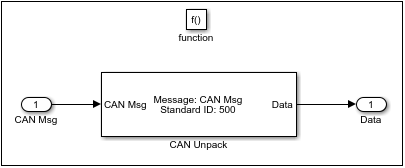
The reason to place the CAN Unpack inside a Function-Call Subsystem is so that it can capture all possible messages.
Click the back-arrow in the toolstrip to return to your model view.
Step 9: Connect the Blocks
Rename the Function-Call Subsystem block to CAN Unpack Subsystem.
Connect the CAN Msg output port of the CAN Receive block to the In1 input port of the CAN Unpack Subsystem block.
Connect the f() output port of the CAN Receive block to the function() input port of the CAN Unpack Subsystem block.
For a visual display of the simulation results, drag the Scope (Simulink) block from the Simulink block library into your model.
Connect the CAN Msg output port of your CAN Unpack Subsystem block to the input port of the Scope block.
The CAN Configuration block does not connect to any other block. This block configures the CAN channel used by the CAN Receive block to receive the CAN message.
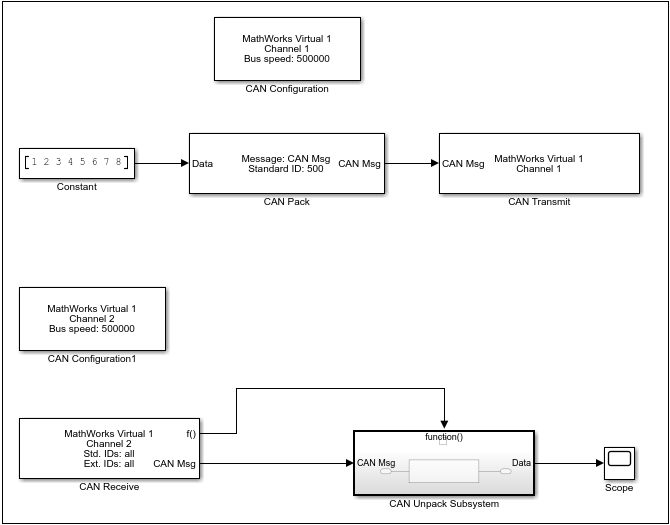
Your model looks like this figure.
Step 10: Specify the Block Parameter Values
Set parameters for the blocks in your model by double-clicking the block.
Configure the CAN Configuration1 Block. Double-click the CAN Configuration block to open its parameters dialog box. Set the:
Device to
MathWorks Virtual 1 (Channel 2).Bus speed to
500000.Acknowledge Mode to
Normal.Click OK.
Configure the CAN Receive Block. Double-click the CAN Receive block to open its Parameters dialog box. Set the:
Device to
MathWorks Virtual 1 (Channel 2).Sample time to
0.01.Number of messages received at each timestep to
all.Click OK.
Configure the CAN Unpack Subsystem. Double-click the CAN Unpack subsystem to open the Function-Call Subsystem editor. In the model, double-click the CAN Unpack block to open its parameters dialog box. Set the:
Data to be output as to
raw data.Name to the default value
CAN Msg.Identifier type to the default
Standard (11-bit identifier).Identifier to
500.Length (bytes) to the default length of
8.Click OK.
Save and Run the Model
This section shows you how to save the model you built, Build the Message Transmit Part of the Model and Build the Message Receive Part of the Model.
Step 11: Save the Model
Before you run the simulation, save your model by clicking the Save icon or selecting Save from the Editor toolstrip Simulation tab.
Step 12: Change Configuration Parameters
In your model Editor toolstrip Modeling tab, click Model Settings. The Configuration Parameters dialog box opens.
In the Solver Options section, select:
Fixed-step from the Type list.
Discrete (no continuous states) from the Solver list.
Step 13: Run the Simulation
To run the simulation, click the Run button in the Simulation or Modeling tab of the Editor toolstrip.
When you run the simulation, the CAN Transmit block gets the message from the CAN Pack block. It then transmits it via Virtual Channel 1. The CAN Receive block on Virtual Channel 2 receives this message and hands it to the CAN Unpack Subsystem block to unpack the message.
While the simulation is running, the status bar at the bottom of the model window updates the progress of the simulation.
Step 14: View the Results
Double-click the Scope block to view the message transfer on a graph. If you cannot see all the data on the graph, click the Autoscale toolbar button, which automatically scales the axes to display all stored simulation data.
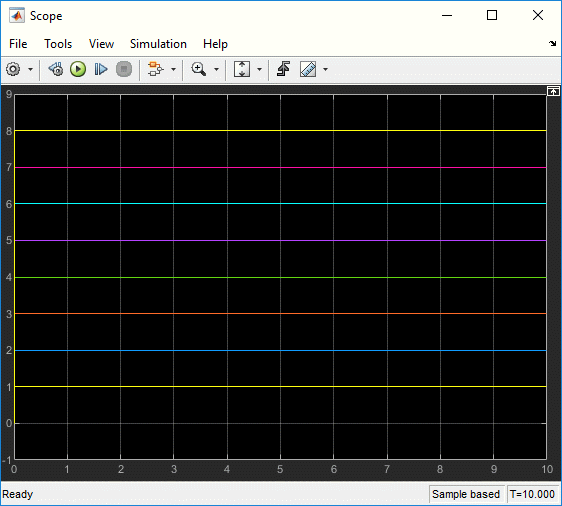
In the graph, the horizontal axis represents the simulation time in seconds
and the vertical axis represents the received data value. You configured the
model to pack and transmit an array of constant values, [1 2 3 4 5 6 7
8], every 0.01 seconds of simulation time. These values are
received and unpacked. The output in the Scope window represents
the received data values.
See Also
Topics
- Open Models (Simulink)